Just in case anyone is still having issues getting the things running on Google Cloud, here are my steps for creating a DL instance from scratch. I’m using the script from https://github.com/fastai/courses. This uses Python 2.7, and Keras 1.2.2. I recommend using this config (instead of Python3 and Keras2) unless you know what you are doing.
STEP 1
I assume you already know how to create an instance on Google Cloud. See https://cloud.google.com/compute/docs/instances/create-start-instance if you don’t.
Create a n1-standard-1 instance with Ubuntu 16.04, a single GPU and a bootdisk of 20GB. Create the instance in a zone where GPU’s are available, see https://cloud.google.com/compute/docs/gpus/. You can use a different instance with more CPU or memory, if you want. Give the instance a network tag jupyter. We need this to create a firewall rule later.
Optionally, create and attach a persistent data disk. This is not required for the lessons, but it can be useful if you want to keep data or models when deleting the instance. I named the instance “deeplearning”, so this becomes the name of the boot disk too and I named the data-disk “deeplearning-data”.
STEP 2
Ssh into the instance.
STEP 3
Download the script that installs CUDA, Anaconda etc:
wget https://raw.githubusercontent.com/fastai/courses/master/setup/install-gpu.sh
STEP 4
Run the script:
sudo sh install-gpu.sh
At the end you need to pick a password for the jupyter notebook. This script also clones the course materials from https://github.com/fastai/courses/.
STEP 5
reboot, either using the reboot command or the reset option on the console:
sudo reboot
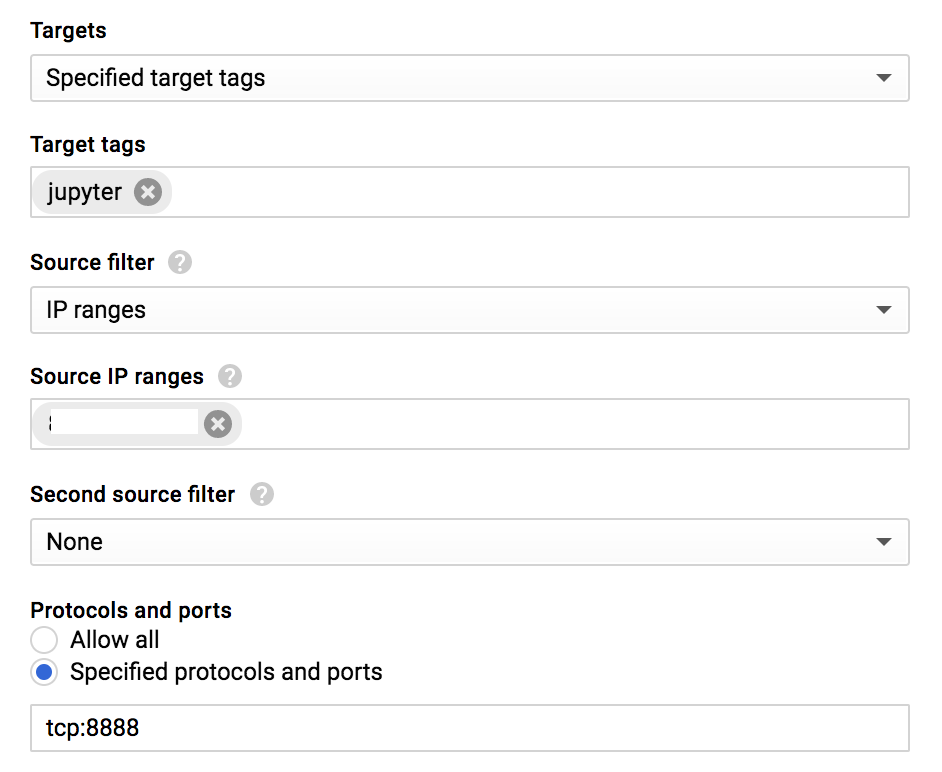
STEP 6
Create a firewall rule for accessing port 8888 from your local machine, using the console or the command line:
export PROJECT="project_name"
export YOUR_IP="enter_the_ip_of_your_local_machine"
gcloud beta compute --project "${PROJECT}" firewall-rules create "jupyter" --allow tcp:8888 --direction "INGRESS" --priority "1000" --network "default" --source-ranges "${YOUR_IP}" --target-tags "jupyter"
STEP 6
When the instance has restarted, ssh into the instance again and check if CUDA is installed properly:
sudo modprobe nvidia
nvidia-smi
STEP 7
Run jupyter notebook:
jupyter notebook --ip=0.0.0.0 --port=8888
Note the token displayed in the terminal. Go to the notebook using the external IP of your instance.
At this point everything is set up for doing the lessons.
STEP 8 (optional)
Format and mount the data-disk with the following commands. This mounts the data disk to the /opt/my_data directory. Feel free to use a different location.
export MOUNT_DIR=/opt/my_data
# ${hostname} is the name of the instance
export DISK_NAME=${hostname}-data
export DISK_MOUNT_POINT=/dev/disk/by-id/google-${DISK_NAME}

sudo mkdir -p ${MOUNT_DIR}
sudo chmod 777 ${MOUNT_DIR}

# uncomment next line to format disk, don't do this if your data-disk already has data
# mkfs.ext4 -F ${DISK_MOUNT_POINT}
sudo mount -o discard,defaults ${DISK_MOUNT_POINT} ${MOUNT_DIR}

backup fstab
sudo cp /etc/fstab /etc/fstab_old

# change fstab so the disk is mounted after a reboot
printf "${DISK_MOUNT_POINT} ${MOUNT_DIR} ext4 defaults 0 0\n" | sudo tee -a /etc/fstab