@muellerzr which libraries should we install in colab to have the latest version of the library, I found from a post of @Srinivas the following but I struggle to understand what he/you mean:
I see that there is a difference in the installation commands between the two nbs.
Older version says:
import os
!pip install -q fastai2 fastcore torch feather-format kornia pyarrow wandb nbdev fastprogress --upgrade
!pip install torchvision==0.4.2
!pip install Pillow==6.2.1 --upgrade
os._exit(00)
Seems to fix torchvision and Pillow versions (note that error reported with PILLOW_VERSION is only in Pillow 7.0.0) so this could be the cause???. Do not know whether fixing torchvision version is important as well??
In addition two more minor questions to our study group: 1) what does the syntax git+https above mean? 2) is there a way to run the fastai2 documentations notebook easily in colab? I believe it would help me a lot to understand it better rather than just looking at the executed code. How are you guys doing it? Thanks a lot!!
Hi @mgloria that’s exactly what I think it’s happening, but I still have this doubt, can we pass anything while creating dataloader as source as long as we handle it using get_items, get_x and get_y?
The syntax git+https is nothing but git+{repo url}, basically what it does is clones the repo and install it as python library. Exactly similar to doing a simple pip install but pip install git+{repo url} allows you install the most updated copy from github. Depending on when you install pip install git+{repo url} can be broken, while pip install installs the last stable release.
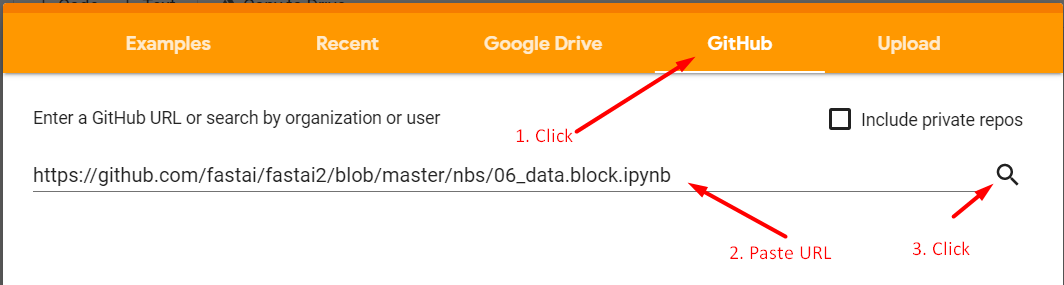
You can simply open https://colab.research.google.com/ click on Github tab, paste the notebook github url, and press the search button next to it.
The two scripts do not do the same thing. I saved time by installing direct versions of torch and torchvision as else it would install 1.4.1 then downgrade. Yes. This is the environment you need to stay in if you want to use the library. It will break if you try the most recent installations of everything.
On documentation, run the same script for installs of the lib then just run them.
If I’m creating a manual list of transforms via a Pipeline. how to I add cuda to that? I tried doing lambda x: x.cuda() as one of the transforms, but this this gets applied to PILImage and an error is throw, I think this has to do with the order of the transforms
EDIT: I also tried to put TensorImage into the Pipeline by doing TensorImage.new with no success
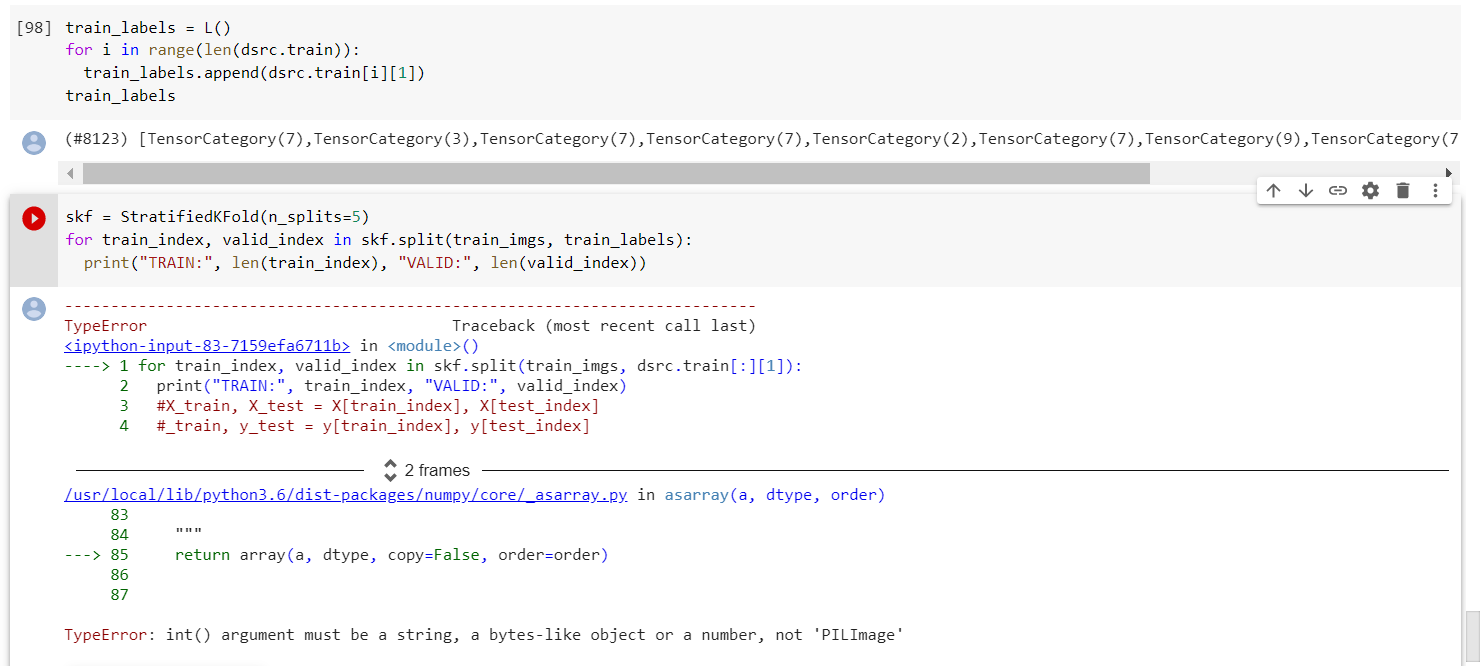
Does anybody know a good reason why we using in the tutorial notebook the non-stratified K-split version?
from sklearn.model_selection import KFold
Would it not be better to use stratified splits to make sure that all classes are represented in the training and validation set? e.g. in case of imbalanced datasets we may have the problem that one of the minority classes does not appear in the training examples and this would then raise an error.
Basically I was only able to get the regular KFold working @mgloria. If anyone can figure out how to get Stratified working instead that would be great
I want to catch up with your walk with fastai2 but I also get the “cannot import name 'PILLOW_VERSION' from 'PIL'” error with torch 1.3.1. and pillow 7.0.0.
Is there another workaround for that problem (I didn’t find via the forum search)?
Yes some things do get buried under this thread sadly I can’t think of a good way to go about doing that for the big things. I know you can do a summary of the thread that goes by likes but that’s about it.
We could add the note to the top? However, maybe that changes soon and is not needed anymore. People are super helpful here if this gets asked again, so we will solve it anyway.


 I can’t think of a good way to go about doing that for the big things. I know you can do a summary of the thread that goes by likes but that’s about it.