If anyone is interested, here’s a little project to test out your skills implementing and testing an architecture. What I’m looking for is pytorch implementations suitable for imagenet of preact resnet and the classifier backbone part of yolo v3 (which the paper calls darknet-53).
Note that there are some pytorch implementations of preact resnet out there already, but:
They’re incomplete implementations of the paper (they don’t have the proper starting/ending blocks, for instance)
They’re for cifar-10, not imagenet (I haven’t looked into it, but there seem to be some little differences).
In particular, I’m interesting in preact-resnet50 - although an implementation presumably would easily allow any of the resnets to be built.
There’s also an implementation of darknet-53 already for pytorch, but it is messy and ugly and uses a config file rather than a normal pytorch approach to defining the network.
I’m looking for implementations that are:
Concise and readable (e.g refactor repeated code into modules)
Tested against the paper to confirm you get the same results (I can help with this if you don’t have access to a suitable machine; but you can do some initial testing by at least running a hundred batches or so and comparing to the reference implementations in darknet / lua. You could also simply compare to regular rn50 for a hundred batches or so and confirm it’s faster.)
For bonus points, do an senet version of preact resnet
Let us know here if you start on this so that we can coordinate.
I’ve done a bit of research on preact resnet without realizing it when I was looking for resnet 56 (and actually using preact resnet 56) and I was also looking at Yolo v3 to get better results on the pascal notebook, so would love to help on this.
Though my little GPU or my Paperspace machines won’t be able to do experiments on ImageNet so I’d definitely need some technical help.
Oops! The pre-act resnet for imagenet idea was a dumb one - sorry. As explained here this actually makes imagenet worse, except for ridiculously large networks. So let’s stick with darknet-53 for this project.
The same method is also used in the paper that trains rn50 in an hour:
I’ll try making the change to the stride-2 layer they suggest. I believe @binga is working on the photometric distortions. And we already have a PR for the aspect ratio augmentations. So we’re getting close I hope!
@jeremy are you interested in a paper implementation of RetinaNet as well so that we can compare it darknet-53 and compare it with your tweaks to it presented in the lesson 10? To have a baseline.
I’m interested in retinanet, but not as part of this project; this project is simply to create an imagenet classifier. darknet-53 is only a classifier, but retinanet does localization. darknet-53 is interesting since it gives high accuracy classifications but is faster than resnet.
I’ve started an implementation of darknet-53. The model itself is finished, I’ll try to test it against the original darknet implementation and resnet-101/152 (at least for ~1 hour in P4000) and share everything tomorrow.
I’m not entirely sure of how they connect their blocks since they’re very vague in the Yolov3 paper, and it’s very confusing in the config files we cans elsewhere, but I’ve done it in the same spirit as Preact Resnet.
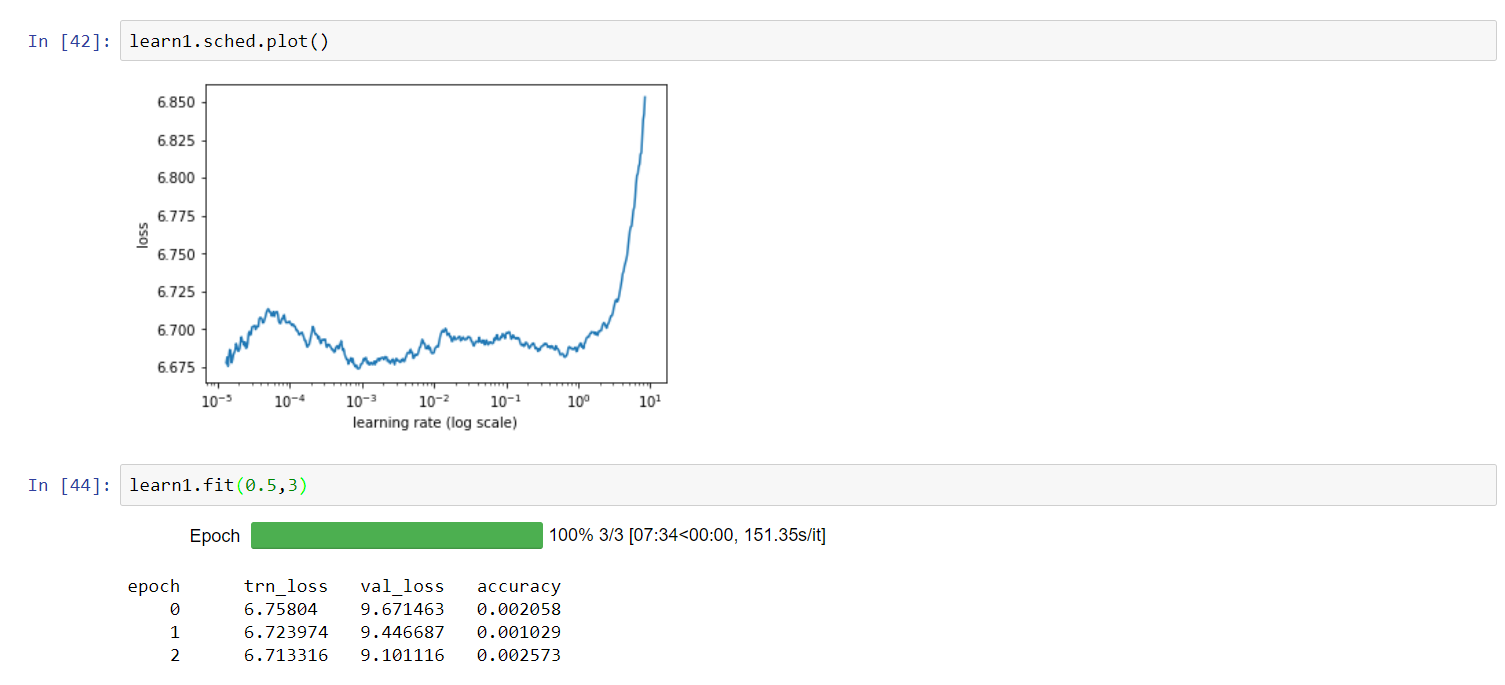
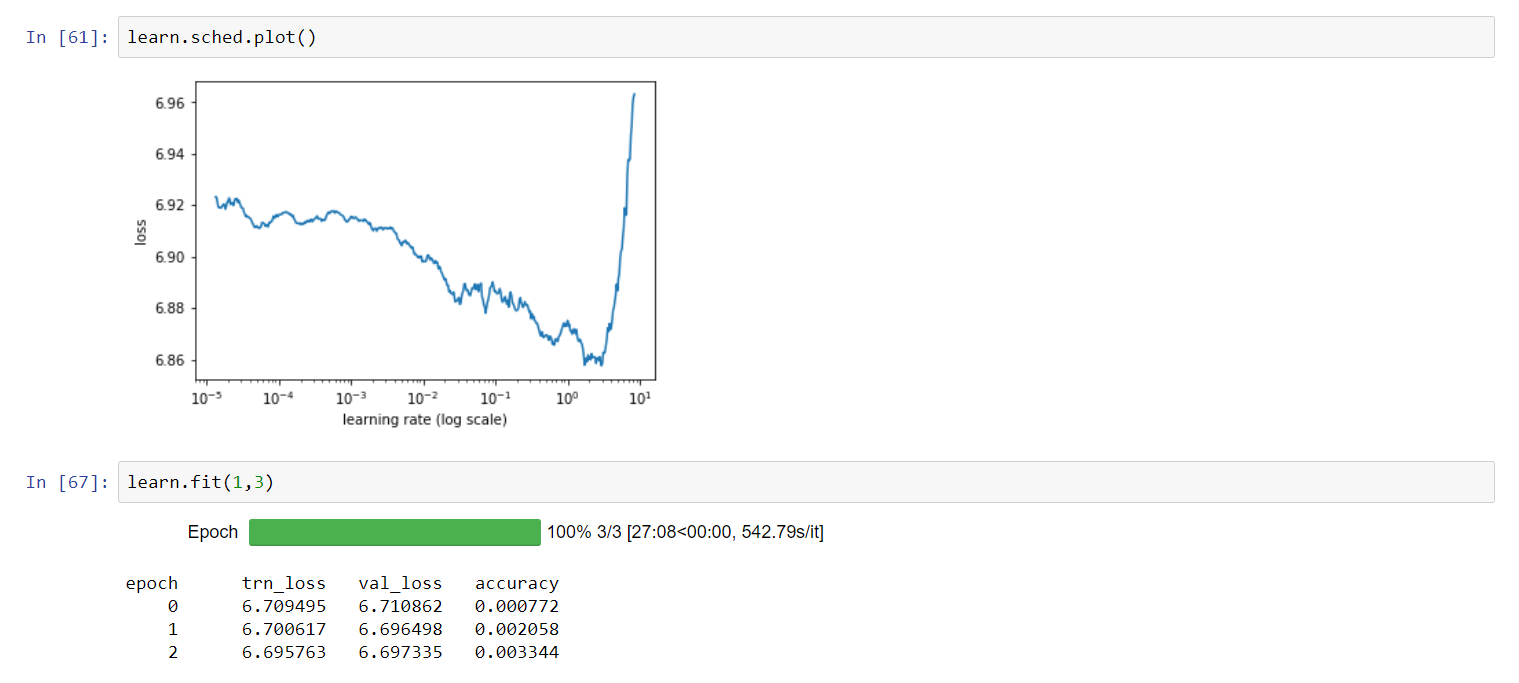
I’ve tried to fit for a few epochs on the sample set you shared, Jeremy, and I find this with Resnet50:
Also, I’ve just discovered that they apparently use Leaky ReLUs (though it’s said nowhere in the paper) so I’m trying to see if it gives better results.
Any feedback on the notebook is welcome. Edit There was a typo in my initial notebook so it changed the results a bit.
This is looking good! Will be interesting to compare to @emilmelnikov’s results - would be good to use the same dataset to test.
One approach to checking might be to try loading the config file in the existing pytorch version and then print out the network? I do suspect leaky relu will work a bit better BTW.