I’ve never requested spot instances before but I’m receiving this error when trying to create the instance as laid out in the wiki. Trying for N. Virginia and have tried both the amazon and fast.ai amis.
Any clues as to what might be going on?
(dlearn) Elizabeths-MacBook-Pro-2:miscdep elizabeth$ . ec2-spotter/fast_ai/start_spot_no_swap.sh --ami ami-fb8e19ed --subnetId subnet-164a142a --securityGroupId sg-c81c4ab6

An error occurred (MaxSpotInstanceCountExceeded) when calling the RequestSpotInstances operation: Max spot instance count exceeded
Waiting for spot request to be fulfilled...
I am having problem with NVIDIA-SMI as well, it looks like it is failing at swap.
there are two volume connected to the instance, and lsblk /dev/xvdf shows
NAME MAJ:MIN RM SIZE RO TYPE MOUNTPOINT
xvdf 202:80 0 128G 0 disk
└─xvdf1 202:81 0 128G 0 part /
Hi @bahram1 and @ecase
I just went through setting up the AWS spot instance and had both of these issues, in case it still helps you (or someone later…):
The “MaxSpotInstanceCountExceeded” error may be because AWS set you a limit of zero spot instances. That was true in my case. I had to fill up a second “change limit request”. I asked to extend the p2.xlarge limit again and wrote in the use case I need spot instance. Took them less than a day and it worked fine afterwards.
I also had the Nvidia issue. The easiest way to check is run nvidia-smi and see if it works. Once I got it working, everything else was fine. There are several posts above here that helped. For me, somehow just reinstalling Nvidia like was suggested (and restarting several times) still didn’t work.
Instead, I installed a regular p2.xlarge instance using the course’s scripts, made sure everything worked there and then used the second method in Slava’s “Persistent Spot Instances How To” to copy that instance into a spot instance. Works great so far. Here are my steps :
Get the regular p2 instance working. Make sure nvidia-smi , cuda, etc. work. Don’t turn it off
Used Slava’s ‘config_from_instance’ script to get all the details into the my.conf file.
Request/Start the new spot instance and ssh into it.
Note that I also ran into my ‘vcg’ limit with AWS. If you get an error about this, you’ll have to either (1) go to the AWS console and delete the VCG you created for the spot instance or (2) change the ‘create_p2.sh’ script to use the existing VCG and security group.
I hope there’s nothing wrong with all of this. A side bonus is that you get a persistent IP. I also think (not sure though, my first time with AWS) that this way you can launch the regular p2 instance and it will automatically use the same volume that gets swapped into the spot instances. If that’s correct, you can do any upgrades or other things you don’t want randomly destroyed in the middle in ‘On Demand’ (regular) mode and then switch to Spot mode for the usual things.
Hope this helped, please let me know if you try this and something doesn’t work.
“nvidia-smi” worked before I swap the volume and failed on the new spot instance:
NVIDIA-SMI has failed because it couldn’t communicate with the NVIDIA driver. Make sure that the latest NVIDIA driver is installed and running.
I tried to reinstall the driver and ran into a weird situation:
sudo apt-get install cuda-drivers
Reading package lists… Done
Building dependency tree
Reading state information… Done
cuda-drivers is already the newest version (375.66-1).
0 upgraded, 0 newly installed, 0 to remove and 10 not upgraded.
1 not fully installed or removed.
After this operation, 0 B of additional disk space will be used.
Do you want to continue? [Y/n] y
Setting up open-iscsi (2.0.873+git0.3b4b4500-14ubuntu3.3) …
Job for iscsid.service failed because a configured resource limit was exceeded. See “systemctl status iscsid.service” and “journalctl -xe” for details.
invoke-rc.d: initscript iscsid, action “restart” failed.
● iscsid.service - iSCSI initiator daemon (iscsid)
Loaded: loaded (/lib/systemd/system/iscsid.service; enabled; vendor preset: enabled)
Active: failed (Result: resources) since Sun 2017-06-04 04:26:07 UTC; 8ms ago
Docs: man:iscsid(8)
Process: 2358 ExecStart=/sbin/iscsid (code=exited, status=0/SUCCESS)
Process: 2350 ExecStartPre=/lib/open-iscsi/startup-checks.sh (code=exited, status=0/SUCCESS)
Jun 04 04:26:07 ip-10-0-0-8 systemd[1]: Starting iSCSI initiator daemon (iscsid)…
Jun 04 04:26:07 ip-10-0-0-8 systemd[1]: iscsid.service: Failed to read PID from file /run/iscsid.pid: Invalid argument
Jun 04 04:26:07 ip-10-0-0-8 systemd[1]: iscsid.service: Daemon never wrote its PID file. Failing.
Jun 04 04:26:07 ip-10-0-0-8 systemd[1]: Failed to start iSCSI initiator daemon (iscsid).
Jun 04 04:26:07 ip-10-0-0-8 systemd[1]: iscsid.service: Unit entered failed state.
Jun 04 04:26:07 ip-10-0-0-8 systemd[1]: iscsid.service: Failed with result ‘resources’.
dpkg: error processing package open-iscsi (–configure):
subprocess installed post-installation script returned error exit status 1
Processing triggers for initramfs-tools (0.122ubuntu8.8) …
update-initramfs: Generating /boot/initrd.img-4.4.0-59-generic
WARNING: missing /lib/modules/4.4.0-59-generic
Ensure all necessary drivers are built into the linux image!
depmod: ERROR: could not open directory /lib/modules/4.4.0-59-generic: No such file or directory
depmod: FATAL: could not search modules: No such file or directory
W: mdadm: /etc/mdadm/mdadm.conf defines no arrays.
depmod: WARNING: could not open /var/tmp/mkinitramfs_FWobAH/lib/modules/4.4.0-59-generic/modules.order: No such file or directory
depmod: WARNING: could not open /var/tmp/mkinitramfs_FWobAH/lib/modules/4.4.0-59-generic/modules.builtin: No such file or directory
Errors were encountered while processing:
open-iscsi
E: Sub-process /usr/bin/dpkg returned an error code (1)
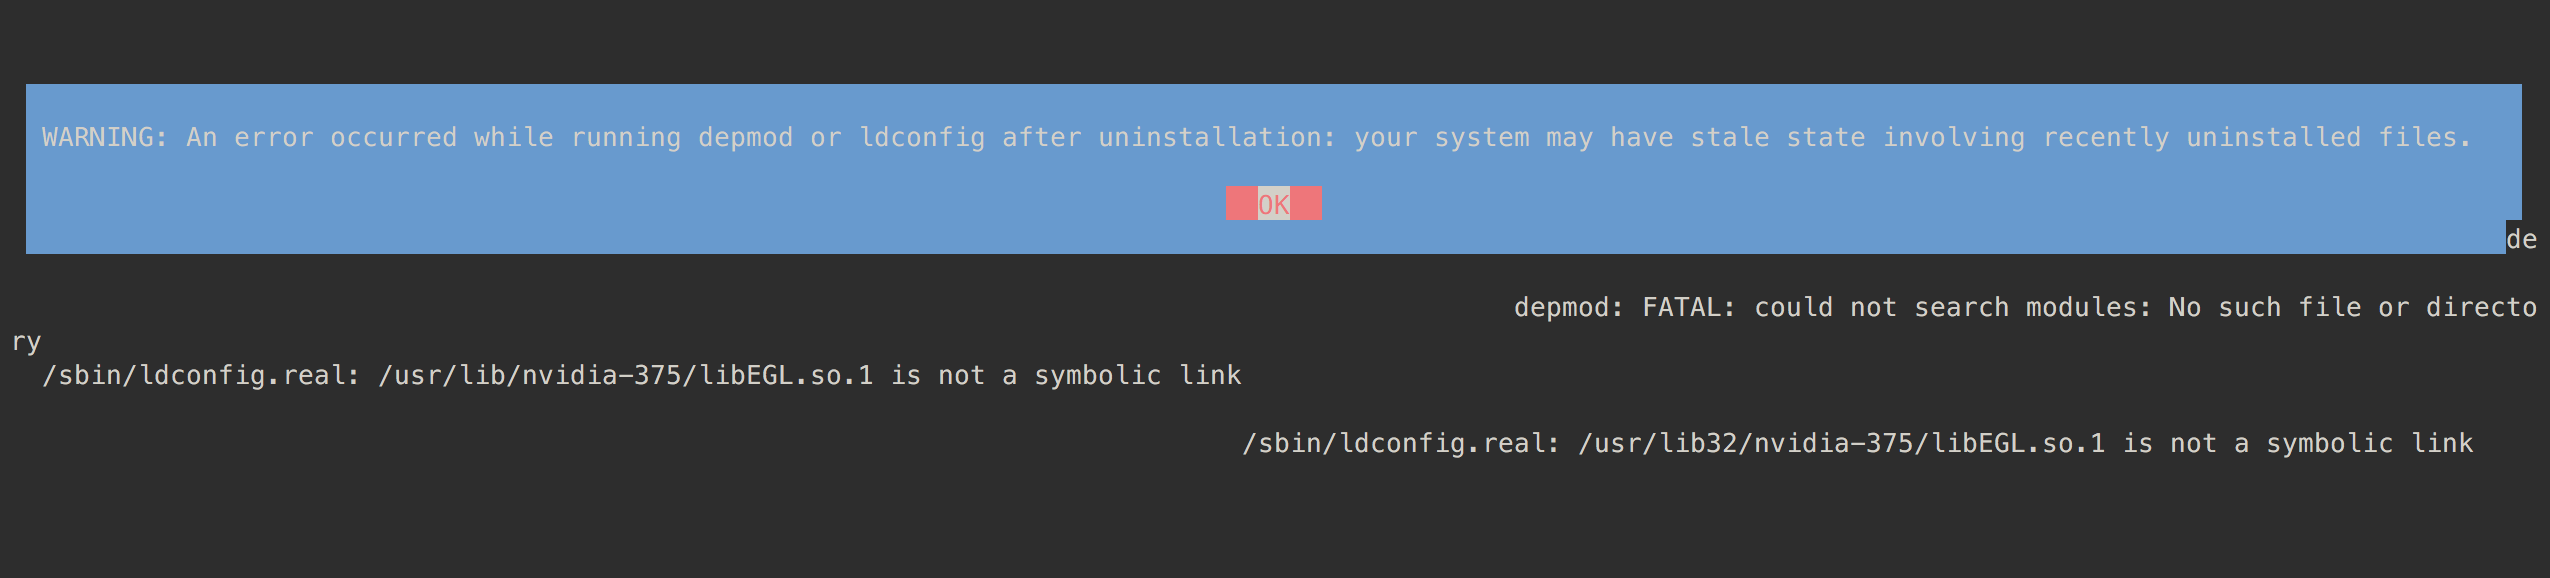
And when I tried to uninstall the previous installation as this page suggested, I saw the following:
Looks like something went really wrong.
Sorry but I don’t know what open_iscsi so can’t help.
Maybe there’s some other AWS limit somewhere? Maybe just terminate (and remove from your account) the instance and the volume and restart the entire process?
An error occurred (MaxSpotInstanceCountExceeded) when calling the RequestSpotInstances operation: Max spot instance count exceeded
I’ve created a case to increase limits to 10. Will see how it goes.
Seems, that after running GPU spot instances became popular, Amazon reseted all limits to 0, where they were undefined
Were you able to figure out the MaxSpotInstanceCountExceeded error? Did you get your limit increased? I am having the same issue. I can request 1 spot instance, but if I try to request any more than that it fails. Then, if I try to request 1 more spot instance after the failure, that fails as well. This is despite my limit being at the default (which is supposedly 20).
I’ve sent request to support, asking to increase limit to 10 on June,5. The answered me back, telling that they’ve requested service team to increase limit up to 200. This followup happened on June,6.
No other news yet.
I’ve found out that after swapping root volumes, most of the time the GPU driver goes wrong. I tried to fix it using the advice from the above posts but failed and I actually have no idea what causes the problem. I also find that if I just start the spot instance (without swapping volumes) everything works well. So I come up with a (temporary) solution. After setting up my own environment and downloading datasets, I create my own AMI. The next time I want to use the server, I start with my own AMI-id and upload my code. Also, I need to download the model after running experiments. It requires more work but it’s definitely better than struggling with the strangely behaved GPU driver.
The specific instructions are as follows:
First, start a fresh machine with fast.ai AMI following this post:
. ec2-spotter/fast_ai/start_spot_no_swap.sh --ami [fast.ai AMI-id in your region] --subnetId [your subnet] --securityGroupId [your security group]
Second, set up your own environment. The fast.ai AMI lacks a lot of stuff. My own settings include:
install anaconda (Python 3.6 version).
update Keras to Keras 2.
install pytorch. I install pytorch from the latest source code following this guide. I reported a bug two weeks ago. It’s fixed in the master branch but not yet updated in any release.
install zip, unzip, …
install Spacy & NLTK, download their data and models (If you work in NLP they’re frequently used)
Finally, open AWS console (webpage), right-click on your spot instance and choose “Image-Create Image”. Wait until the operation completes and terminate your instance. You’ll get the id of your own AMI. Next time you launch your machine, replace the fast.ai AMI id by this new id.
I know it’s not a perfect solution, but I currently rely on this. Hope it will help those whose GPU driver constantly goes wrong…
Thanks a lot @gaiar. Your’s is the only solution that worked for me. All the other solutions ended up in weird nvidia driver issues. Once the volume swapping failed but i can attach manually, rest of the time it worked perfectly fine.
I’m also encountering this problem. restarting or running 'sudo dpkg --configure -a as you suggested does not seem to help. @slazien - any other ideas? It seems like some inconsistency between the cuda drivers version which was updated after the swapping
I found one problem, however it does not seem to resolve the issue. It seems like the system is missing a specific version of linux-image-extra.
Try to run sudo apt-get install --reinstall nvidia-375 and note for any Fatal error. You might notice: depmod: ERROR: could not open directory /lib/modules/4.4.0-64-generic: No such file or directory
In order to fix this run sudo apt-get install linux-image-extra-4.4.0-64 or what ever version you were missing.
After that you might want to reinstall CUDA by doing: sudo apt-get purge --autoremove cuda sudo apt-get install cuda sudo modprobe nvidia nvidia-smi
And now I’m getting
sudo modprobe -v nvidia
modprobe: ERROR: ../libkmod/libkmod-module.c:832 kmod_module_insert_module() could not find module by name='nvidia_375'
modprobe: ERROR: could not insert 'nvidia_375': Unknown symbol in module, or unknown parameter (see dmesg)
Thanks a lot @rqyang. I tried all of the options mentioned in the post to swap the volume with no successes. Your option worked great for me! The only setbacks are:
If you have changes to the system/installations that you wish to keep, then you need to update the AMI
HI guy, actually i m facing MaxSpotInstanceCountExceeded error and could not figure out how to proceeds further.I m currently following the course’s wiki to start a spot instance.Any help regarding this is highly appreciated. Thank you !!
Sorry, Ashish, I was away. I just opened a customer service case with AWS and asked them to increase my Spot Instance limit. Took 24 hours and they did it.
Hope it helps.
OMG, I think I just fixed it. It’s early days but this might help someone.
For context, I was getting all the errors that everyone has had, nvidia-smi not working, the open-iscsi not loading, sudo modprobe nvidia not working.
I decided to setup my stuff in ireland as that is where it was originally tested, but I think that the actual solution is not related to that.
I believe the problem is that the kernel version of the host system and the chroot environment are different. And that the chroot environment doesn’t have the right kernel information. So, after booting into the chroot’d spot instance, try the following:
uname -r to find out what the kernel of the container is, in my case 4.4.0-59
Now, we need to install the image and headers for this kernel. If you go to ls /lib/modules
you should see that your kernel information is not actually there.
To install the kernel stuff type: sudo apt-get install linux-image-<your kernel number>-generic
and sudo apt-get install linux-headers-<your kernel number>-generic
relpace with your kernel number, for instance sudo apt-get install linux-headers-4.4.0-59-generic
Then, install the nividia kernel module sudo modprobe nivida
now try nvidia-smi
and if it doesn’t error, and instead shows you something like
+-----------------------------------------------------------------------------+
| NVIDIA-SMI 367.48                 Driver Version: 367.48                    |
|-------------------------------+----------------------+----------------------+
| GPU  Name        Persistence-M| Bus-Id        Disp.A | Volatile Uncorr. ECC |
| Fan  Temp  Perf  Pwr:Usage/Cap|         Memory-Usage | GPU-Util  Compute M. |
|===============================+======================+======================|
|   0  Tesla K80           Off  | 0000:00:1E.0     Off |                    0 |
| N/A   43C    P0    72W / 149W |      0MiB / 11439MiB |     96%      Default |
+-------------------------------+----------------------+----------------------+

+-----------------------------------------------------------------------------+
| Processes:                                                       GPU Memory |
|  GPU       PID  Type  Process name                               Usage      |
|=============================================================================|
|  No running processes found                                                 |
+-----------------------------------------------------------------------------+
I’m new with linux and need some help, due to the high cost of the instances on demand I decided to switch to the spot instances. I have followed the steps in Using an Existing Instance to use the same instance that was on demand.
I describe the steps I followed:
Stop on demand instance and detach its root volume.