Installing from scratch, plus Jeremy’s preferred tweaks
Install Ubuntu 18.04 LTS Server
Run the steps in this gist (but probably one step at a time to ensure it’s all OK)
Minimal subset of the full gist
If you already have Linux configured the way you want, here’s the steps to install CUDA and cudnn (note that your existing pytorch anaconda versions aren’t enough - you need to install it at system level):
cd
mkdir download
cd download
wget https://developer.nvidia.com/compute/cuda/10.0/Prod/local_installers/cuda_10.0.130_410.48_linux
chmod u+x cuda_10.0.130_410.48_linux
./cuda_10.0.130_410.48_linux --extract=`pwd`
sudo ./cuda-linux.10.0.130-24817639.run -noprompt
echo /usr/local/cuda-10.0/lib64 | sudo tee -a /etc/ld.so.conf
sudo ldconfig
echo 'export PATH=/usr/local/cuda-10.0/bin:$PATH' >> ~/.bashrc
source ~/.bashrc

cd ~/download
wget http://files.fast.ai/files/cudnn-10.0-linux-x64-v7.5.0.56.tgz
tar xf cudnn-10.0-linux-x64-v7.5.0.56.tgz
sudo cp cuda/include/cudnn.h /usr/local/cuda/include
sudo cp -P cuda/lib64/libcudnn* /usr/local/cuda/lib64
sudo chmod a+r /usr/local/cuda/include/cudnn.h /usr/local/cuda/lib64/libcudnn*
sudo ldconfig
Now we can setup s4tf:
cd ~/download/
wget https://storage.googleapis.com/swift-tensorflow-artifacts/releases/v0.3/rc1/swift-tensorflow-RELEASE-0.3-cuda10.0-cudnn7-ubuntu18.04.tar.gz
# apt-fast is recommended because it's fast. Can you just `apt` if you prefer
sudo apt-fast -y install git cmake ninja-build clang python uuid-dev libicu-dev icu-devtools libbsd-dev libedit-dev libxml2-dev libsqlite3-dev swig libpython-dev libncurses5-dev pkg-config libblocksruntime-dev libcurl4-openssl-dev systemtap-sdt-dev tzdata rsync
tar xf swift-tensorflow-RELEASE-0.3-cuda10.0-cudnn7-ubuntu18.04.tar.gz
cd
mkdir swift
cd swift
mv ~/download/usr ./
cd
echo 'export PATH=~/swift/usr/bin:$PATH' >> ~/.bashrc
source ~/.bashrc

mkdir -p git
cd ~/git
git clone https://github.com/google/swift-jupyter.git
cd swift-jupyter
python register.py --sys-prefix --swift-python-use-conda --use-conda-shared-libs   --swift-toolchain ~/swift
cd ~/git
git clone https://github.com/fastai/fastai_docs.git
cd fastai_docs/
jupyter notebook
Updating
Here’s how to update to the latest release (replace the file name below with the latest release filename):
wget https://storage.googleapis.com/swift-tensorflow-artifacts/releases/latest/swift-tensorflow-RELEASE-LATEST-cuda10.0-cudnn7-ubuntu18.04.tar.gz
tar xf swift-tensorflow-RELEASE-LATEST-cuda10.0-cudnn7-ubuntu18.04.tar.gz
cd ~/swift/
rm -rf usr
mv ~/download/usr ./
cd ~/git/swift-jupyter
git pull
python register.py --sys-prefix --swift-python-use-conda --use-conda-shared-libs   --swift-toolchain ~/swift
Note: hitting http://yann.lecun.com/exdb/mnist/ from dozens of computers at once is a bad idea; you can replace that folder with https://storage.googleapis.com/cvdf-datasets/mnist/ to use a Google-backed mirror.
Just confirming this worked for me on a new google cloud compute Ubuntu 18.04 instance. (And I’m happy about it).
To use the notebook, I’m connecting using
gcloud compute ssh --zone=$ZONE jupyter@$INSTANCE_NAME -- -L 8888:localhost:8888 (google cloud specific but that’s the port forwarding config).
Only trick to remember is to remember to conda activate swift once you log in & before you start jupyter notebook otherwise jupyter won’t see your Swift kernel. I’m sure you could (and I probably will) append my .bashrc to do this step automagically.
It does for me by renaming the python3-6 folder to python3-7 in swift/usr/lib (but this is a bit hacky). Here is a gist of a script I use to update my S4TF to the most recent build. Remove the line that renames the python directory if you followed Jeremy’s install, but otherwise it should work I believe.
Not strictly part of the S4TF instructions, but I also had to pip install fire in the swift conda env to be able to run the course Python notebooks & exports as well as the Swift stuff.
Actually we shouldn’t be using that. Instead we should be using fastai.script.call_parse. Kinda embarrassed that I’m not actually using the CLI lib that I wrote!..
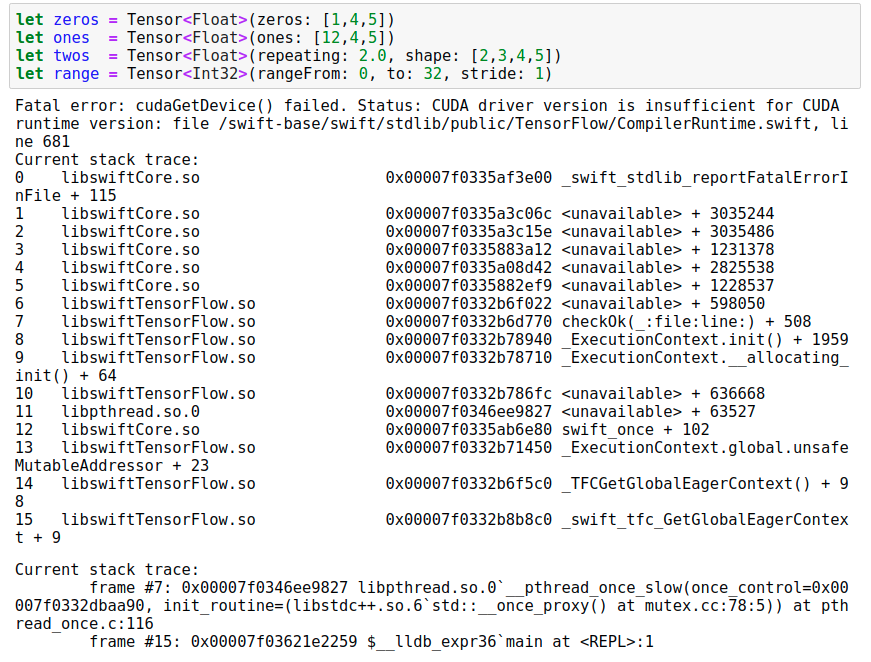
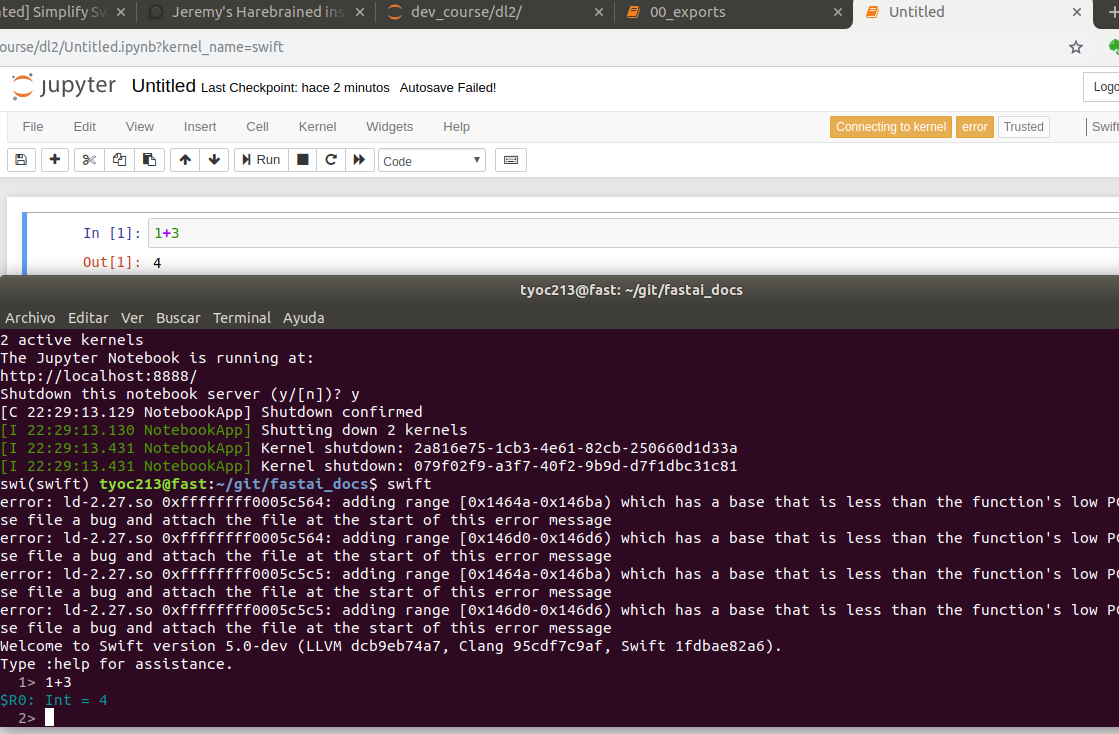
Nice, finally I can use swift… I dont know what exactly fixed the error error: failed to stop process at REPL breakpoint but it is probably the cuda and cudn setup and maybe the 3.6 because probably I was using 3.7.
But now it is working, I have used the minimal subset of the full list. Now I need to clean all the other installs and builds.
Forgot to mention… but my notebook always… always no matter what I do on the config ask me for a password (not even entering the token)… so probably we should run some like
I also had to install the pytorch nightly to run the current notebooks; I just forced conda to splat the main pytorch package: conda install -c pytorch pytorch-nightly --force-reinstall (make sure you’re in the swift conda env).
Another PSA: After following this script, my git username & email was set to Jeremy Howard,info@fast.ai Don’t forget to change yours, or you might wonder how “Jeremy” is able to commit to your github repos…
FYI on a machine with preexisting Nvidia 418 driver and CUDA 10.1, it worked using the minimal steps starting with conda create.
I wasn’t sure Tensorflow was going to work since it seems to want CUDA 10.0 - but then so far it’s only doing the download of MNIST (I think) so may be it hasn’t gotten to any CUDA version conflicts.
Reporting that I have successfully installed and ran 00_load_data.ipynb on a fresh Ubuntu 18.04 LTS image on GCP. I followed Jeremy’s script line by line.
A couple of notes for those who experience strange messages when running source ~/.bashrc.
Line 50 is inaccurate and redundant. The Anaconda3 install adds lines to .bashrc that handle that part, and my Anaconda3, for whatever reason, lives in /home/jupyter not /home/ubuntu. I did decide to add conda activate swift after the fact, though, which means I didn’t need line 51 either.
Line 127 is a repeat of line 61. I just deleted the extra one.
I found this worked except I got an error with the line
The glob expansion didn’t work (I think because lib64 was not readable by my user), so I found the names of all the libcudnn files (ls cuda/lib64/libcudnn*) and executed chmod on them.
I tried the renaming trick you mention: mv ~/swift/usr/lib/python3.7 ~/swift/usr/lib/python3.7-bak mv ~/swift/usr/lib/python3.6 ~/swift/usr/lib/python3.7
but still get the following error:
python3 register.py --sys-prefix --swift-python-use-conda --use-conda-shared-libs --swift-toolchain ~/swift Traceback (most recent call last): File "register.py", line 239, in <module> main() File "register.py", line 139, in main kernel_env = make_kernel_env(args) File "register.py", line 99, in make_kernel_env libpython = glob(sys.prefix+'/lib/libpython*.so')[0] IndexError: list index out of range
Did you install the nvidia drivers? They need to be present even if you have installed cuda and cuDNN. What does nvidia-smi say? Please, refer to lines 35-39 of the complete script Jeremy posted.
Don’t know if this is the appropriate place to ask, but would like to get this ecosystem installed on the NVIDIA Jetson Nano. It uses the ARM64 architecture and supports UBUNTU-18.04 debian style installs. I looked at various websites yesterday for install packages for SWTF and came up with this one, but could not get it to play with jupyter-swift. Can someone in the SWTF team get me pointed in the correct direction.
 Don’t forget to change yours, or you might wonder how “Jeremy” is able to commit to your github repos…