@vikasbahirwani How do the CPUs compare on these two boxes? Training seems to be heavily CPU bound, to the point that I and many others have initially thought it wasn’t using our GPUs at all.
A couple other things to verify would be disk I/O and RAM read/write rates. M.2 drives can be much faster than SATA SSDs.
1 Like
@jeremy I tried for almost 3 hours and searched the forum for almost an hour. I wasn’t able to find anything other than this thread.
I can’t financially support for the cloud service.
I have a 2GB radeon enabled graphics processor.
I’ve been trying to do the above mentioned steps but have failed every time and these errors

keep showing.
Please Help me to solve this.
I badly want to successfully complete this course and step towards Deep Reinforcement Learning.
You should use Google Colab, which is free. You can’t use a 2GB card, or an AMD card, for this course.
(Please don’t at-mention me, unless it’s a question specific to me personally)
I really apologize for that.
I’ve been using colab for some days but how am i supposed to install the whole fastai environment in it.
This is discussed in many forum threads.
Thank you. I will take a look.
Do you know why the training is CPU heavy? Augmentation?
Thank you for everything. I was finally able to set up everything.
Jeremy,
Great videos. Can’t express it enough how easy you make this. Learning Deep learning from scratch and moving right along. Your setup for my windows install worked flawlessly.
Can’t wait to make it all the way through your series.
So, as a noob, I have a followup question.
I have the windows install running great on all notebooks. However, I would like to do a Git pull to update my fastai library.
Can i simply go to the command line and run:
git clone https://github.com/fastai/fastai.git
or do i need to go through all of the installation steps again? I’m afraid to experiment with this on my own as i have everything working and lack the skill to repair it if I break something.
I try update my driver and suddenly it find CUDA now.
Yeah, it’s fine. You’ll have to re-do step 8 (changing the symlink).
If something really goes wrong, you can just delete the whole fastai directory and re-run these installation steps.
@jeremy Thank you for excellent and useful write-up on installation on Windows.
@Oonej and others: I will appreciate your help on the following.
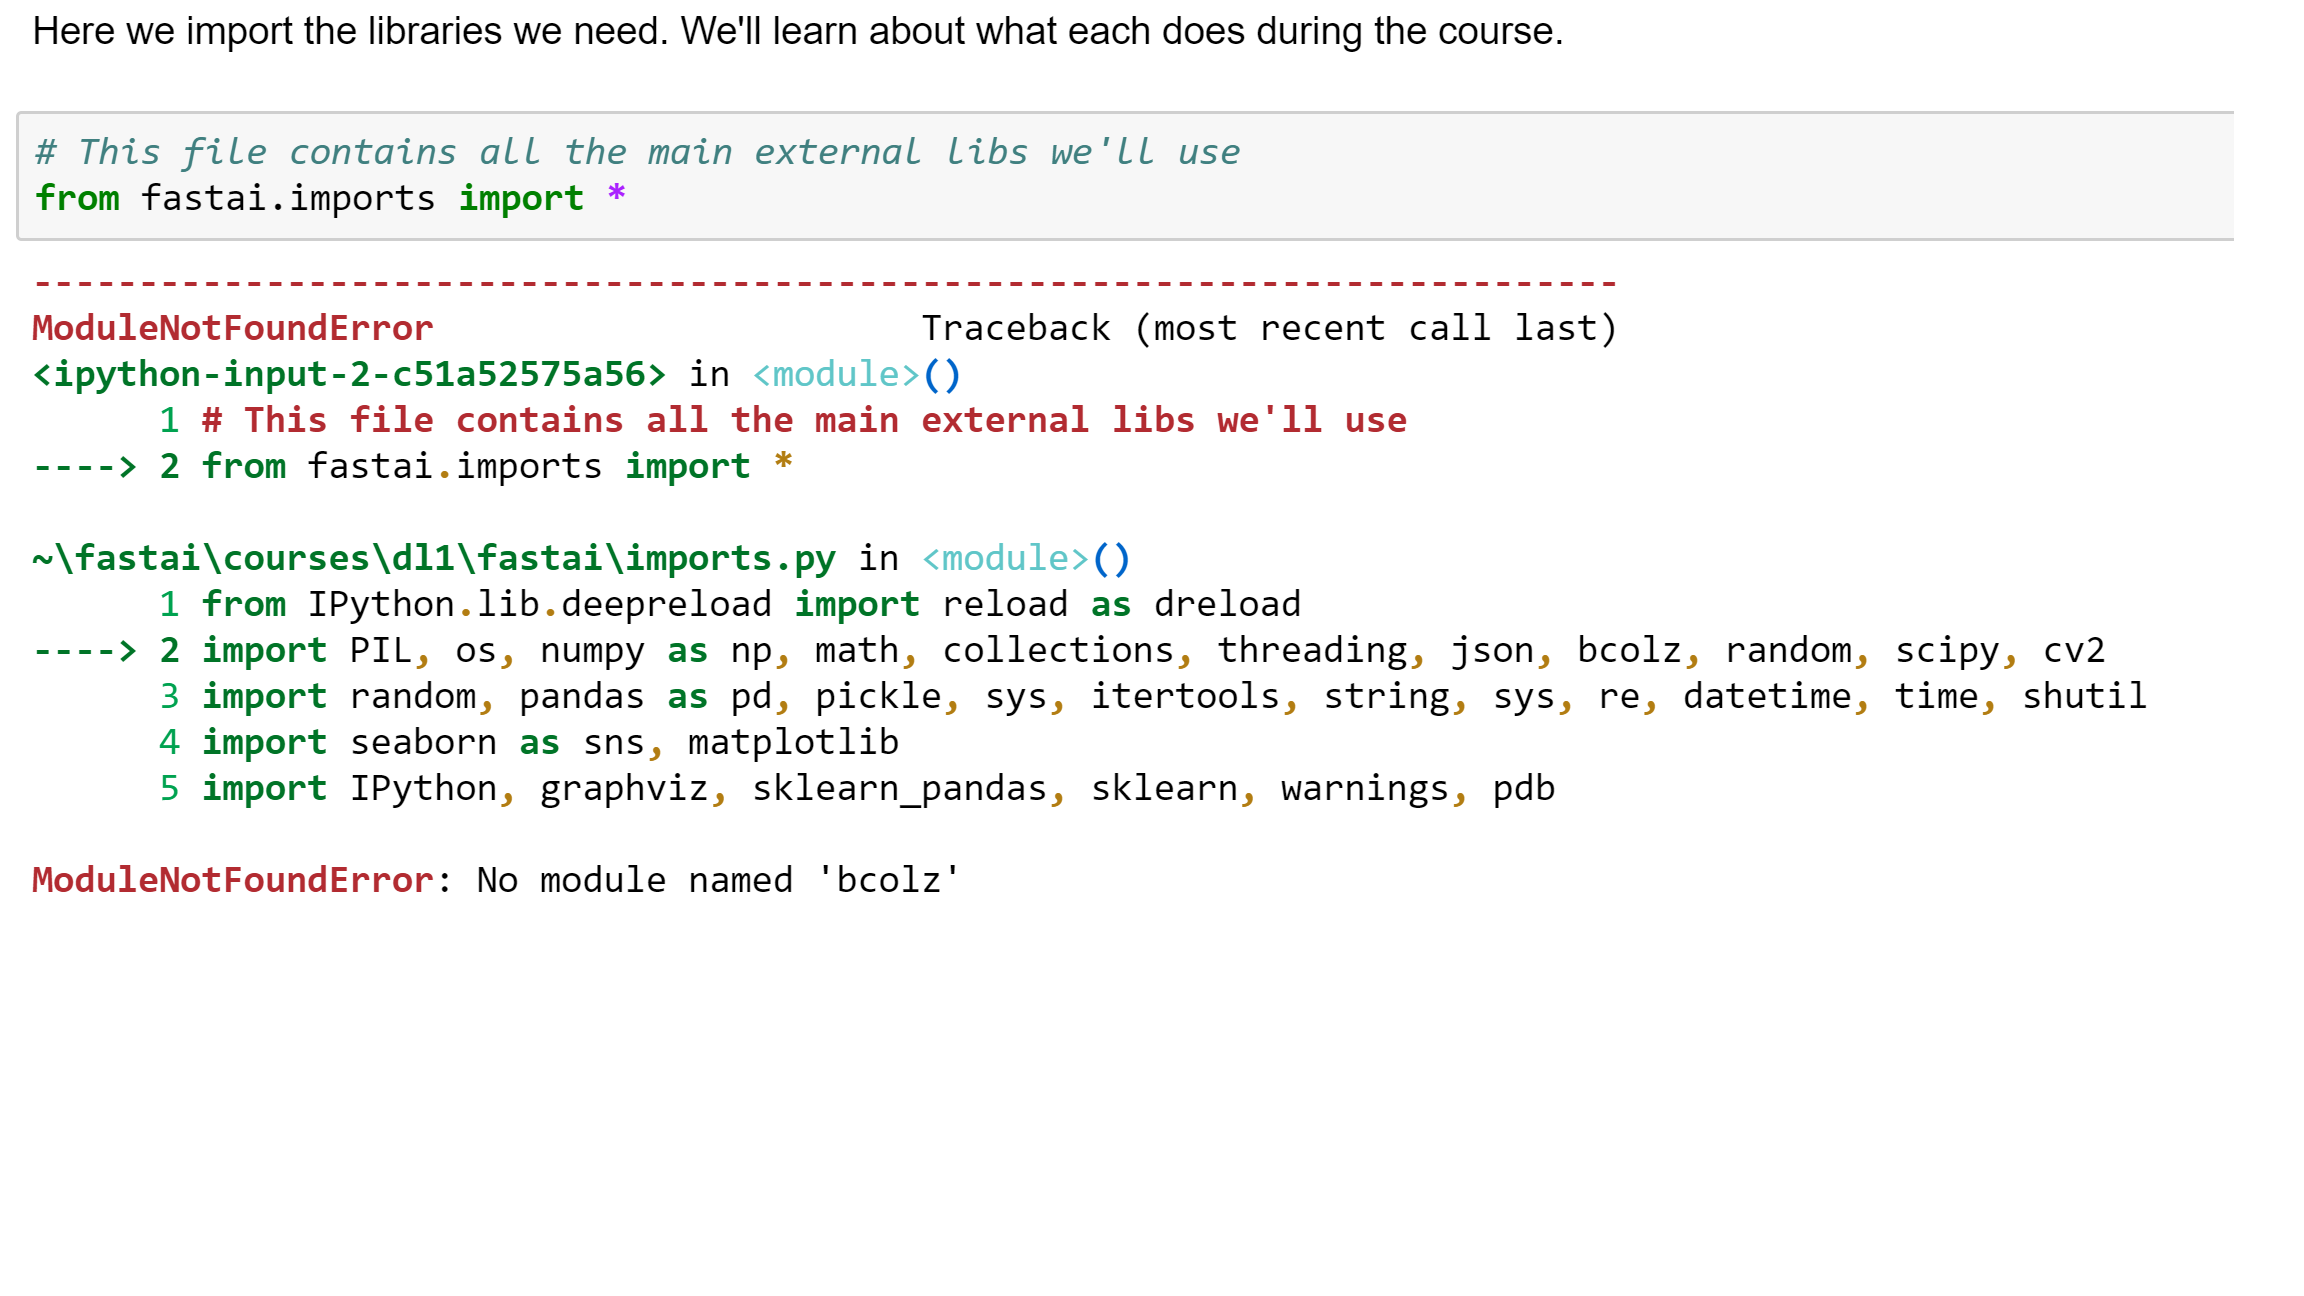
“from fastai.imports import *” cell in lesson1 in Jupyter Notebook on my computer leads to the following error.
---------------------------------------------------------------------------
ImportError                               Traceback (most recent call last)
<ipython-input-2-2f3a3d7866ce> in <module>()
      1 # This file contains all the main external libs we'll use
----> 2 from fastai.imports import *

C:\Windows\System32\fastai\courses\dl1\fastai\imports.py in <module>()
     13 from pandas_summary import DataFrameSummary
     14 from IPython.lib.display import FileLink
---> 15 from PIL import Image, ImageEnhance, ImageOps
     16 from sklearn import metrics, ensemble, preprocessing
     17 from operator import itemgetter, attrgetter

C:\Programs\Anaconda3\lib\site-packages\PIL\Image.py in <module>()
     56     # Also note that Image.core is not a publicly documented interface,
     57     # and should be considered private and subject to change.
---> 58     from . import _imaging as core
     59     if PILLOW_VERSION != getattr(core, 'PILLOW_VERSION', None):
     60         raise ImportError("The _imaging extension was built for another "

ImportError: DLL load failed: The specified module could not be found.Guys I am getting an error of kernel dead for fastai lesson1-rxt50 , I am using “custom_kernel” as mentioned in other threads. I am working on google compute console with 52GB ram and 8 CPU on ubuntu 16.04. Please someone help me out. thanks ,
It means that Ubuntu for Windows can not be used in order to get Fastai running on a GPU on Windows ?
Correct. No CUDA support in WSL
I have questions about your process that does not work until now on my computer (windows 10, GeForce GTX 1070) :
-
Why do we install
Git for Windowsas we don’t open it after ?
EDIT : I got it (it installs in Anaconda Prompt Terminal the git functions and even the unix commands if selected during the installation process) -
I can not use the command
delin my Anaconda Prompt Terminal, onlyrmdir: you know why ?
EDIT : it works now after a new installation of GIT for Windows with the Unix Command option selected. -
I followed your howto guide but I got at the end a “Kernel error” after launching my jupyter notebook with the following list or errors :
EDIT : my kernel python3 works now. It was mykernel.jsonat C:\Users%username%\AppData\Roaming\jupyter\kernels\python3\kernel.json that had an old path to python.exe
Traceback (most recent call last):
  File "C:\Users\alienware\Anaconda3\envs\fastai\lib\site-packages\tornado\web.py", line 1512, in _execute
    result = yield result
  File "C:\Users\alienware\Anaconda3\envs\fastai\lib\site-packages\tornado\gen.py", line 1055, in run
    value = future.result()
  File "C:\Users\alienware\Anaconda3\envs\fastai\lib\site-packages\tornado\concurrent.py", line 238, in result
    raise_exc_info(self._exc_info)
  File "<string>", line 4, in raise_exc_info
  File "C:\Users\alienware\Anaconda3\envs\fastai\lib\site-packages\tornado\gen.py", line 1063, in run
    yielded = self.gen.throw(*exc_info)
  File "C:\Users\alienware\Anaconda3\envs\fastai\lib\site-packages\notebook\services\sessions\handlers.py", line 73, in post
    type=mtype))
  File "C:\Users\alienware\Anaconda3\envs\fastai\lib\site-packages\tornado\gen.py", line 1055, in run
    value = future.result()
  File "C:\Users\alienware\Anaconda3\envs\fastai\lib\site-packages\tornado\concurrent.py", line 238, in result
    raise_exc_info(self._exc_info)
  File "<string>", line 4, in raise_exc_info
  File "C:\Users\alienware\Anaconda3\envs\fastai\lib\site-packages\tornado\gen.py", line 1063, in run
    yielded = self.gen.throw(*exc_info)
  File "C:\Users\alienware\Anaconda3\envs\fastai\lib\site-packages\notebook\services\sessions\sessionmanager.py", line 79, in create_session
    kernel_id = yield self.start_kernel_for_session(session_id, path, name, type, kernel_name)
  File "C:\Users\alienware\Anaconda3\envs\fastai\lib\site-packages\tornado\gen.py", line 1055, in run
    value = future.result()
  File "C:\Users\alienware\Anaconda3\envs\fastai\lib\site-packages\tornado\concurrent.py", line 238, in result
    raise_exc_info(self._exc_info)
  File "<string>", line 4, in raise_exc_info
  File "C:\Users\alienware\Anaconda3\envs\fastai\lib\site-packages\tornado\gen.py", line 1063, in run
    yielded = self.gen.throw(*exc_info)
  File "C:\Users\alienware\Anaconda3\envs\fastai\lib\site-packages\notebook\services\sessions\sessionmanager.py", line 92, in start_kernel_for_session
    self.kernel_manager.start_kernel(path=kernel_path, kernel_name=kernel_name)
  File "C:\Users\alienware\Anaconda3\envs\fastai\lib\site-packages\tornado\gen.py", line 1055, in run
    value = future.result()
  File "C:\Users\alienware\Anaconda3\envs\fastai\lib\site-packages\tornado\concurrent.py", line 238, in result
    raise_exc_info(self._exc_info)
  File "<string>", line 4, in raise_exc_info
  File "C:\Users\alienware\Anaconda3\envs\fastai\lib\site-packages\tornado\gen.py", line 307, in wrapper
    yielded = next(result)
  File "C:\Users\alienware\Anaconda3\envs\fastai\lib\site-packages\notebook\services\kernels\kernelmanager.py", line 148, in start_kernel
    super(MappingKernelManager, self).start_kernel(**kwargs)
  File "C:\Users\alienware\Anaconda3\envs\fastai\lib\site-packages\jupyter_client\multikernelmanager.py", line 110, in start_kernel
    km.start_kernel(**kwargs)
  File "C:\Users\alienware\Anaconda3\envs\fastai\lib\site-packages\jupyter_client\manager.py", line 259, in start_kernel
    **kw)
  File "C:\Users\alienware\Anaconda3\envs\fastai\lib\site-packages\jupyter_client\manager.py", line 204, in _launch_kernel
    return launch_kernel(kernel_cmd, **kw)
  File "C:\Users\alienware\Anaconda3\envs\fastai\lib\site-packages\jupyter_client\launcher.py", line 128, in launch_kernel
    proc = Popen(cmd, **kwargs)
  File "C:\Users\alienware\Anaconda3\envs\fastai\lib\subprocess.py", line 709, in __init__
    restore_signals, start_new_session)
  File "C:\Users\alienware\Anaconda3\envs\fastai\lib\subprocess.py", line 997, in _execute_child
    startupinfo)
FileNotFoundError: [WinError 2] Le fichier spécifié est introuvable
- My last error now is about
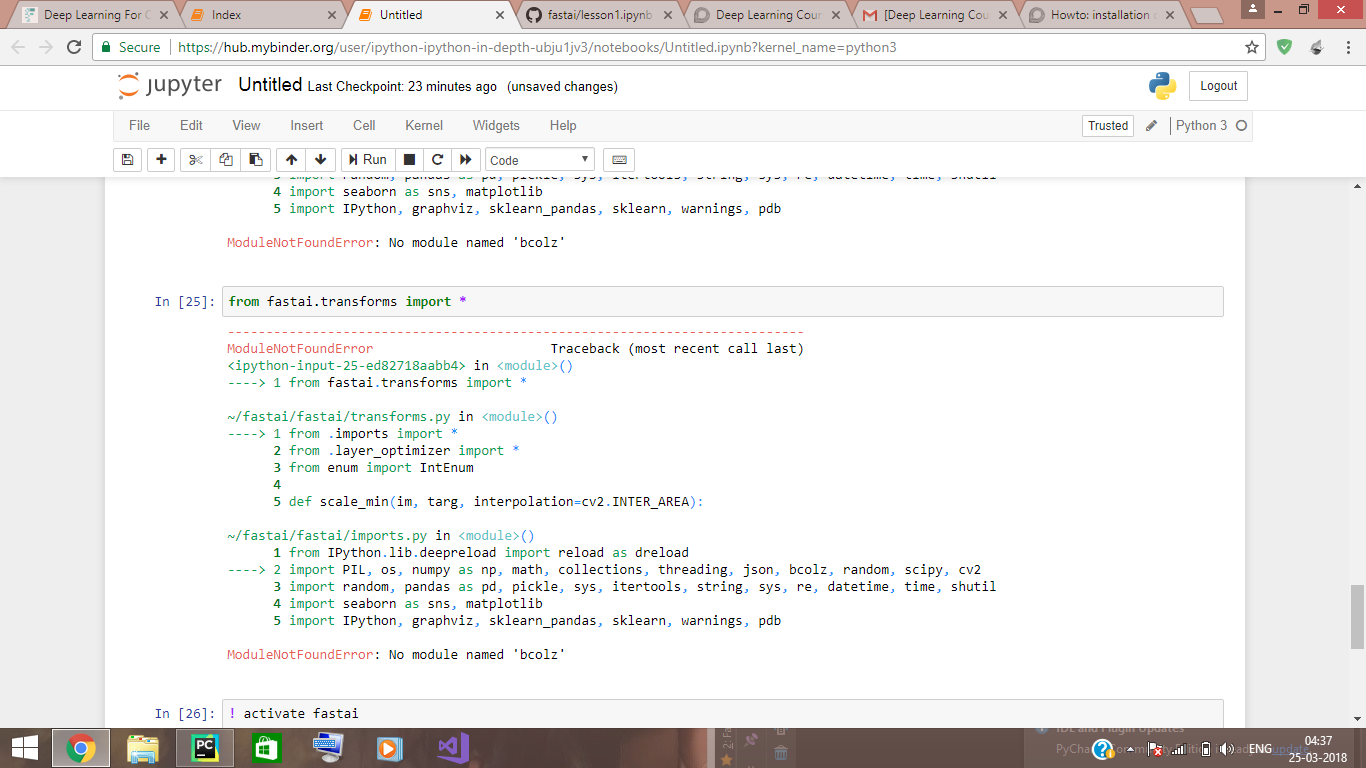
ModuleNotFoundError: No module named 'bcolz'
EDIT : it works now. It was again the wrong path to my python.exe in my kernel.json file.
1 Like
Following Jeremy post for custom installation in windows 10 with Nvidia GPU, I am stuck at conda env update
I did below steps,
- Already have Anaconda with Python=3.6 and Git.
- Opened Anaconda Prompt as admin
- Did
git clone https://github.com/fastai/fastai.git' - then
cd fastai/fastaiin which environment.yml is available. - then when I do
conda env updateI get below error.
 ResolvePackageNotFound:
  - spacy
then based on few answers in above posts and in this link Lesson 4 - OSError: Can't find model 'en',
I ran below two commands and installed & downloaded spacy model successfully
pip install spacy
python -m spacy download en
then when I try to run 5th step again to proceed, I get same ResolvePackageNotFound spacy error. Other people are facing this problem when they run lesson4 notebooks, but I am facing during initial installation itself. Even after installing spacy why am I getting this error, can someone tell me how to proceed further? I have already went through most of the posts available and have been stuck for many hours on this issue.
If you install spacy already, try remove spacy from the environment file and rerun env update, I am guessing this files have been updated recently.
1 Like
I had the same issue, while attempting to use torch on CPU, what solved it for me is to uninstall pytorch
and install the pytorch-cpu version:
conda uninstall pytorch
conda install -c peterjc123 pytorch-cpu
It’s probably not relevant for you anymore but maybe it will help to someone else…
2 Likes