I am having everything in the default enviornment setup by Anaconda3
This setup works perfectly for fast.ai till now… ( i had done conda install everything i want and whenever i want to use my jupyter notebooks, I had just made it point to start at the fast.ai directory by changing the jupyter-config file…
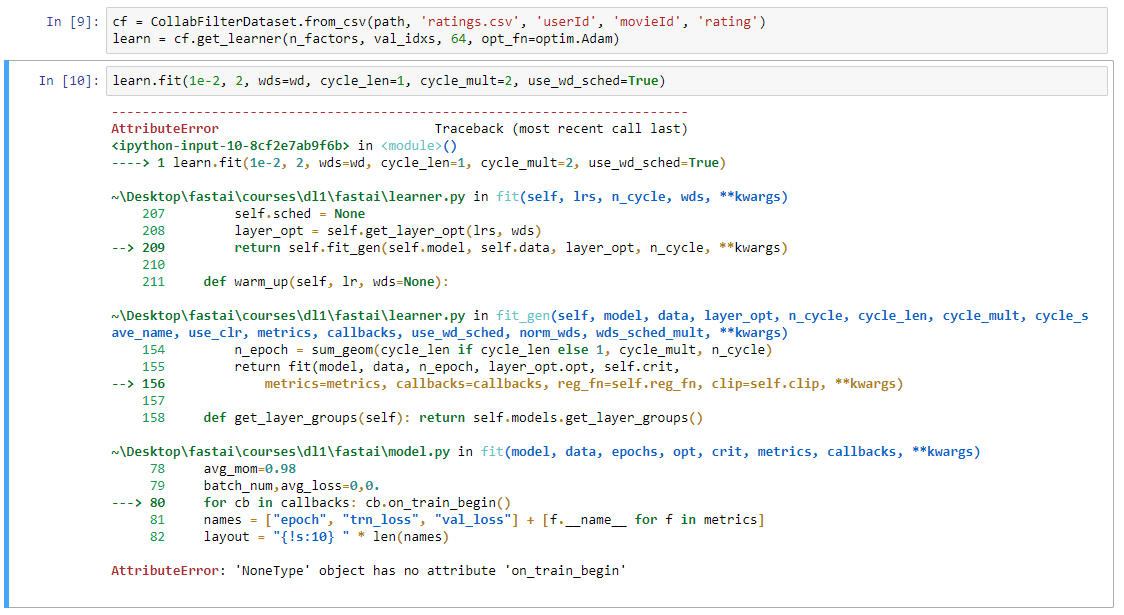
I cannot really figure out why the heck my pytorch does not find cuda. TF works with it flawlessly, and even pytorch installed with my “old instructions” did find it.
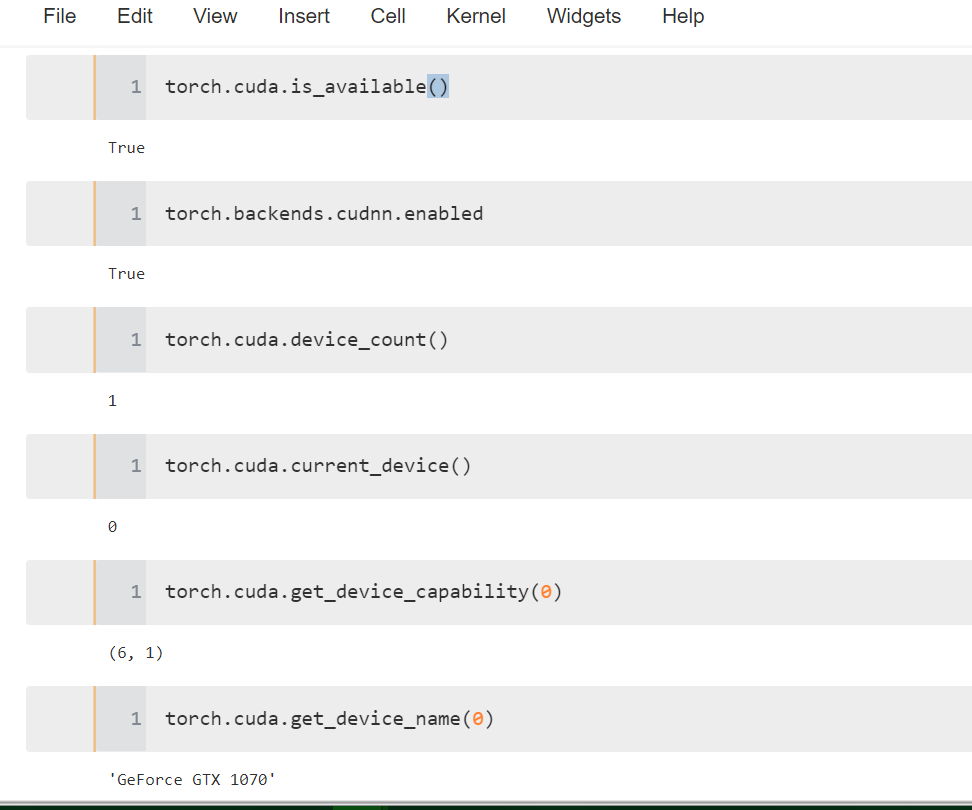
Can you confirm that you called torch.cuda.is_available() and it responded True?
Another thing: how did you install the ipykernel for fastai env?
environment.yml installs a conda package of cudnn and cuda90, so in theory your installed versions (if any) shouldn’t matter. If they do, it suggests you have something in your path ahead of anaconda - which means perhaps you aren’t using the choosing “Anaconda Prompt” from the start menu (since I believe that sets Anaconda’s path to be the first ones).
Note that you don’t have to do anything special to choose a kernel if you install using the method shown in this thread.
I was, like I am now. Still, it required systemwide installation of cuda 9 to get pytorch able to find cuda. Possibly, something was not right with the whole organization of environment vars, and cuda installation straightened them up…!
I noticed it now. It works with my plain python 3 kernel.
Thanks guys, you have have been very supportive, beginning from you, Jeremy!
How did you do that? Just for the sake of curiosity. Manually installed every single package listed in the .yml within base env?
Pytorch uses the gpu the first time I run the model (resnet34). Then, it uses the CPU (you can tell just because it’s kind of 50x slower, no messages are displayed).
It begins to use the gpu again only if I reboot, but just for a run. Then it falls back to the cpu.
AFAIK there is no function in pytorch to perform some gpu reset. Regardless, any idea about what causes that weird behaviour? Note that pytorch finds cuda and cudnn even when it falls back to the cpu.
what makes you think that it is using CPU over GPU? What times are you seeing for the learn.fit operations in lesson1 during data augmentation (3 epochs) and the fine tuning (7 epochs)?
During what I think to be GPU operation, it takes a fraction of second per iteration, while when using the cpu it takes an average of 1.8 secs per iteration. The entire process was taking a few seconds per epoch on the gpu, minutes on the cpu.
The numbers that you show appear to be from a different area of the notebook than what I initially asked. I am more interested in the epochs later in the notebook in the corresponding sections of Data augmentation, and then fine tuning. I logged my results in this thread.
I get the following experience when trying to get the spacy en installed - anyone had this and know how to work around it?
(D:\Anaconda3) D:\>python -m spacy download en
Collecting https://github.com/explosion/spacy-models/releases/download/en_core_web_sm-2.0.0/en_core_web_sm-2.0.0.tar.gz
  Downloading https://github.com/explosion/spacy-models/releases/download/en_core_web_sm-2.0.0/en_core_web_sm-2.0.0.tar.gz (37.4MB)
    100% |████████████████████████████████| 37.4MB 1.4MB/s
  Requirement already satisfied (use --upgrade to upgrade): en-core-web-sm==2.0.0 from https://github.com/explosion/spacy-models/releases/download/en_core_web_sm-2.0.0/en_core_web_sm-2.0.0.tar.gz in d:\anaconda3\lib\site-packages
Requirement already satisfied: spacy>=2.0.0a18 in d:\anaconda3\lib\site-packages (from en-core-web-sm==2.0.0)
Requirement already satisfied: numpy>=1.7 in d:\anaconda3\lib\site-packages (from spacy>=2.0.0a18->en-core-web-sm==2.0.0)
Requirement already satisfied: murmurhash<0.29,>=0.28 in d:\anaconda3\lib\site-packages (from spacy>=2.0.0a18->en-core-web-sm==2.0.0)
Requirement already satisfied: cymem<1.32,>=1.30 in d:\anaconda3\lib\site-packages (from spacy>=2.0.0a18->en-core-web-sm==2.0.0)
Requirement already satisfied: preshed<2.0.0,>=1.0.0 in d:\anaconda3\lib\site-packages (from spacy>=2.0.0a18->en-core-web-sm==2.0.0)
Collecting thinc<6.11.0,>=6.10.1 (from spacy>=2.0.0a18->en-core-web-sm==2.0.0)
Exception:
Traceback (most recent call last):
  File "D:\Anaconda3\lib\site-packages\pip\basecommand.py", line 215, in main
    status = self.run(options, args)
  File "D:\Anaconda3\lib\site-packages\pip\commands\install.py", line 324, in run
    requirement_set.prepare_files(finder)
  File "D:\Anaconda3\lib\site-packages\pip\req\req_set.py", line 380, in prepare_files
    ignore_dependencies=self.ignore_dependencies))
  File "D:\Anaconda3\lib\site-packages\pip\req\req_set.py", line 554, in _prepare_file
    require_hashes
  File "D:\Anaconda3\lib\site-packages\pip\req\req_install.py", line 278, in populate_link
    self.link = finder.find_requirement(self, upgrade)
  File "D:\Anaconda3\lib\site-packages\pip\index.py", line 465, in find_requirement
    all_candidates = self.find_all_candidates(req.name)
  File "D:\Anaconda3\lib\site-packages\pip\index.py", line 423, in find_all_candidates
    for page in self._get_pages(url_locations, project_name):
  File "D:\Anaconda3\lib\site-packages\pip\index.py", line 568, in _get_pages
    page = self._get_page(location)
  File "D:\Anaconda3\lib\site-packages\pip\index.py", line 683, in _get_page
    return HTMLPage.get_page(link, session=self.session)
  File "D:\Anaconda3\lib\site-packages\pip\index.py", line 811, in get_page
    inst = cls(resp.content, resp.url, resp.headers)
  File "D:\Anaconda3\lib\site-packages\pip\index.py", line 731, in __init__
    namespaceHTMLElements=False,
TypeError: parse() got an unexpected keyword argument 'transport_encoding'


 ), I installed cuda 9.

 I gather you installed fastai with pip, right?