I believe new versions of anaconda use ‘conda activate’.
Are you sure you can’t install anaconda? You should be able to install it into your home directory normally.
I’m not sure anyone has tried pip installing the latest fastai on windows so you’ll be rather on your own there I’m afraid!
@whamp I just installed anaconda on a linux box (apart from the windows box i’m using for the course, only because I want run a jupyter “hub” (server) so I can run some of these things while I sleep). When I inicially installed anaconda I noticed something different this time. It had complained about changes between “conda” 4.4 and 4.5. On the linux the path references were change and it asked to “ln” a directory. After doing that and a few other things I was able to access jupyter running on the server on the laptop.
You didn’t mention if you had a windows or linux install.
@DavideBoschetto Hmm. you mentioned that you can’t install Anaconda on the Win 10 PC. Yet you can run pip? pip.exe is located in the anaconda install in the Scripts directory. What types of errors are you getting when attempting to install anaconda?
Have you considered installing cygwin (all default packages) and then select git as an additional package. Then do
git clone https://github.com/fastai/fastai.git.
1 Like
I used Windows for the install. For what it’s worth i also get the complaint re 4.4 conda versus 4.5 but leaving it at 4.4 works fine for me.
Quick info in case someone wants to install this for multiple users (in a lab setting):
I installed everything on a Win10 machine (GTX 1080) and it works fine just following the instructions from the first post because I’m an admin.
To install for multiple users I tried installing Anaconda for all (I know it’s not supported) and the conda env update failed when the non-admin users ran it (I think it bailed on opencv and later on graphviz).
However as an admin I just installed the env “globally” (using the default location of the install) via conda env update -p=C:\ProgramData\Anaconda3\envs\fastai
Not sure if this is ideal or might result in some permission errors down the line*.
Note that you can show all environments with conda env list and to remove a specific environment you can just pass the path, i.e. run conda env remove -p=C:\ProgramData\Anaconda3\envs\fastai
Edit0: Permission errors indeed, I’ll check tomorrow and post the solution 
Edit1: To resolve the permission errors, I simply created a directory in a place where all lab users have appropriate permissions (in our case E:\envs\fastai). I installed the environment with conda env update -p=E:\envs\fastai (strangely this resulted in the environment having no name but it can be started with activate E:\envs\fastai). A student has confirmed that this works.
tl;dr version for multiuser environments:
- Install Anaconda for all users
- Create a directory in a place that has the appropriate permissions for all users (e.g.: E:\envs\fastai)
- As a regular user: conda env update -p=E:\envs\fastai (or wherever your directory is located)
For anyone using this instruction:
please note that pytorch now supports Windows so you should use that instead.
Just execute
conda install pytorch cuda90 -c pytorch
in addition to the process described above
helped me out, Thanks a ton!
David, is this the only part which you need to modify in Jeremy’s instructions to be able to run Fast.ai lessons code on a Windows CPU machine? Do you mind sharing full installation instructions for Windows CPU machine?
Is there a similar web page for the 2018 version of Fast.ai course like this which is for 2017:
http://wiki.fast.ai/index.php/Local_install_(Windows_only:cpu)
Thank you in advance!
Tim
Hi Tim,
I installed the environment more than a month ago so unfortunately I don’t remember all the details.
For the most part I followed Jeremy’s instructions from the beginning of this thread, with the following changes:
- in bullet point 5 instead of
conda env update
I used:
conda env create -f environment-cpu.yml
-
I had to manually install some of the imports - I don’t remember which once but once you run the import cell in the notebook, you will see if something missing
-
Uninstalling pytorch and installing pytorch-cpu
conda uninstall pytorch
conda install -c peterjc123 pytorch-cpu
I hope that this helps,
David
1 Like
tl;dr posting this here as reference to others who might run into a similar issue
I’m using Windows 10 with GeForce GTX 960M. I followed the instructions in this thread by @jeremy and ran my notebook. I got the following error when I first tried to train using torch:
PyTorch no longer supports this GPU because it is too old.
I did some digging and it turns out this deprecation started from 0.3.1 according to this post from Pytorch forums.
I removed the pytorch that was installed in fastai environment.
I downloaded pytorch-0.3.0-py36_0.3.0cu90.tar.bz2 from a link that was available in Peter’s repo for legacy packages. Google drive link
I unpacked it and copy pasted corresponding contents into ..\envs\fastai\Lib\site-packages\
I just finished running the entire lesson1.ipynb successfully with no issues. Hooray! 
3 Likes
Hi Kagan,
I confirmed. Your suggestion solved the error. Thanks for the post.
Regards,
Abhishek
Hi David,
I confirmed. Your suggestion solved the error. Thanks for the post.
Regards,
Abhishek
Hello Jonas,
Thanks for sharing information. So pytorch cuda installation would be required on a windows machine supporting GPU… right? Machine that does not have GPU would not support it, I believe.
I am getting following error (please note I installed pytorch CPU version as described by David Malan)
(base) D:\Users\abhishekt>conda install pytorch cuda90 -c pytorch
Solving environment: failed
UnsatisfiableError: The following specifications were found to be in conflict:
- backports.functools_lru_cache
- pytorch
Use "conda info " to see the dependencies for each package.
pytorch supports working with CPU as well, and I do not see why the installation should not work. Unfortunately I have no idea concerning the particular error you get.
However I question if it makes sense to use a CPU - you need the efficient parallel matrix / tensor operations and the deep learning algorithms of NVIDIA to get the performance you need. A CPU has a handful of cores whereas a GPU has thousands. Instead I would use the virtual environments suggested in the course: Paperspace, AWS, Crestle… good luck!
@jeremy
For step8:
For Windows 10 in developer mode and Git for Windows (I’m running 2.17.1(2)) I believe symlinks are properly created.
del fastai
will delete all the files within the directory instead of deleting the shortcut. I was then confused as to why the fastai imports didn’t work
Perhaps a warning note for step 8 is required for Windows 10?
My situation is this:
- I’d like to take the fast.ai course using a paperspace GPU.
- I’ve never used linux/ubuntu, but always only windows.
I see two options:
- I could buy acces to a paperspace machine with the fast.ai (linux based) public template. Downside is, that I’d probably have all kinds of problems using ubuntu, which would slow down my progress in deep learning.
- I could buy acces to a paperspace machine with a windows 10 template. Downside is, that I’d not have easy acces to the data sets (and probably also other stuff) used in the fast.ai course.
Am I understanding my options correctly? Is there a third alternative? Have any of you been in the same situation as me, and if so, what are your experiences?
Best,
Kristian
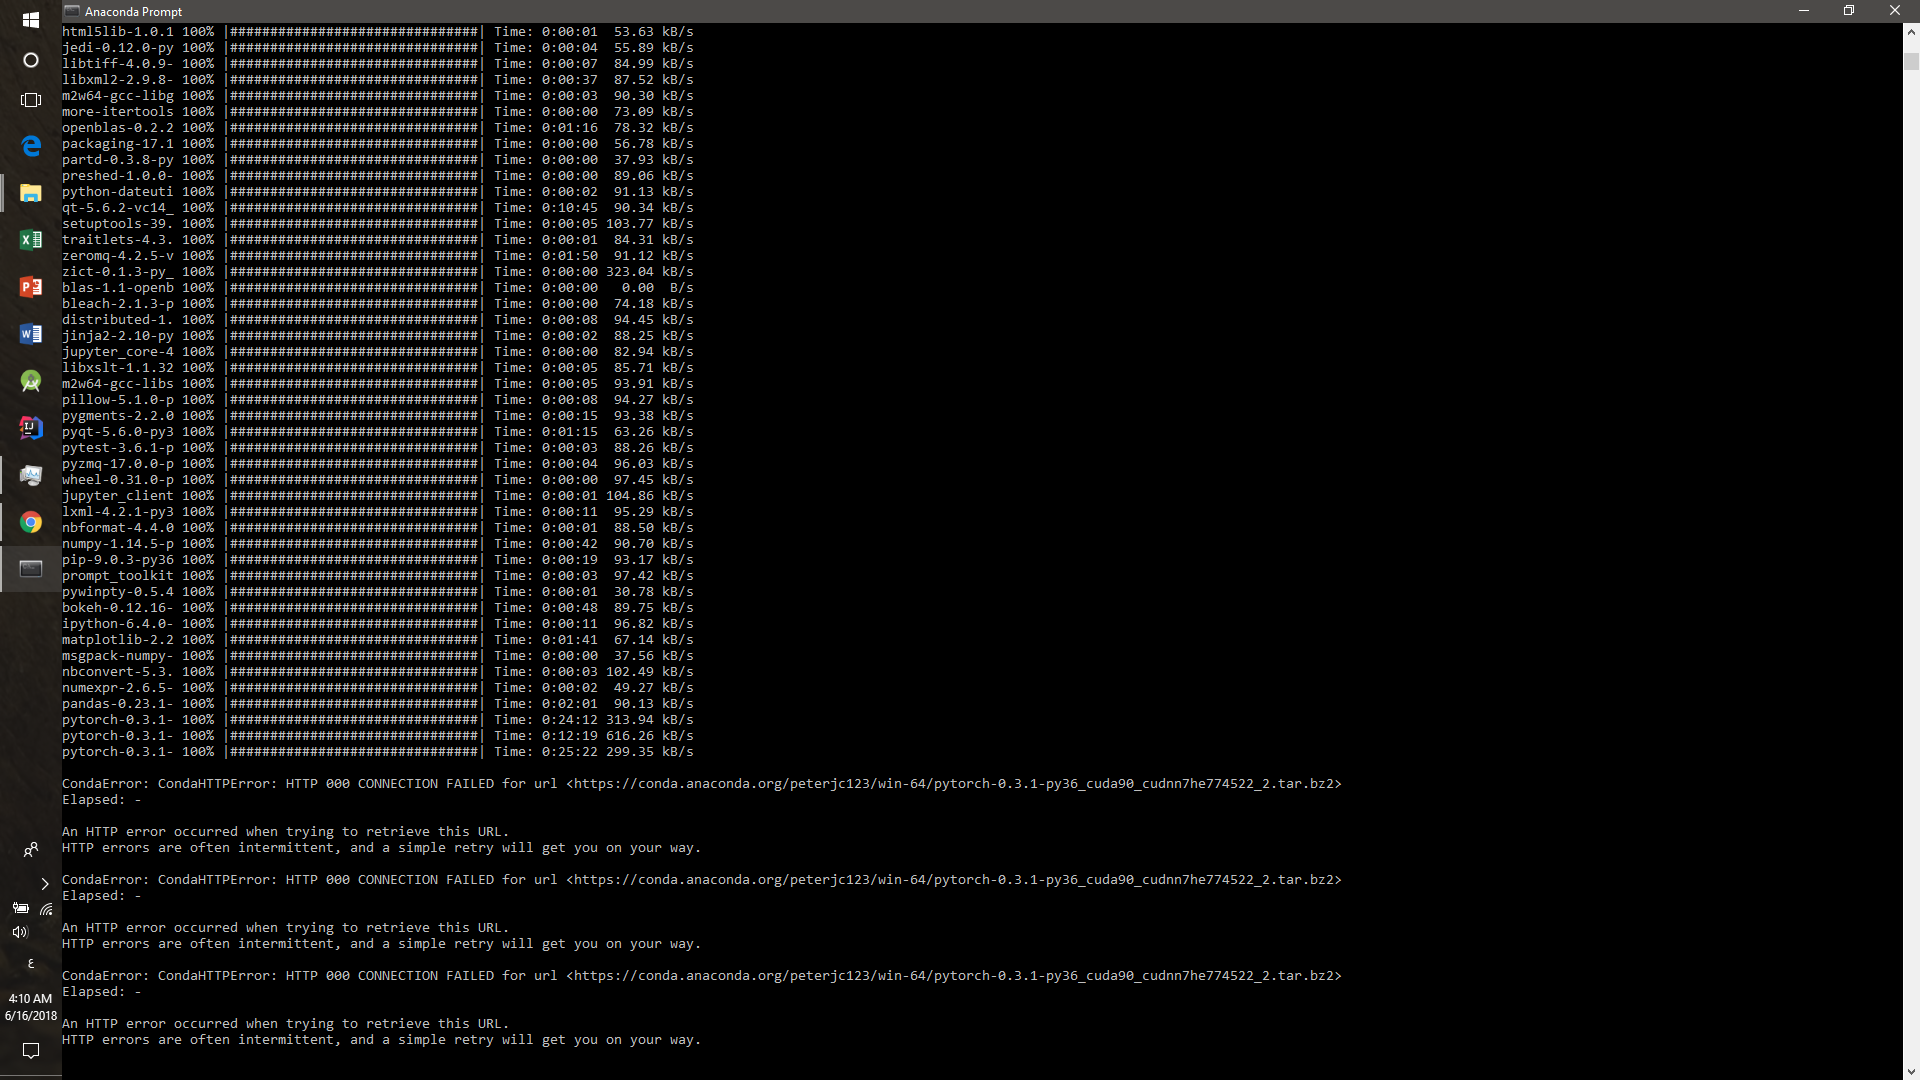
hey, after executing “conda env update” it show me this error, when i retry the command it process the last three “pytorch-0.3.1-” packages then show me the same error, i tried to install pytorch using CMD by “pip3 install http://download.pytorch.org/whl/cpu/torch-0.4.0-cp36-cp36m-win_amd64.whl” but it doesn’t change any thing here?
i have the same GPU, i’m trying to start but i’m stuck here, can you help me?