Hello Chris,
Were you able to get Azure to run? I got stuck when setting up the Deep Learning DC VM.
Hi Jefferson
No, I haven’t even had time to try it yet, but I do intend to try soon. I’ll let you know if I make any progress…
Hi, I managed to create a VM (Deep Learning template).
So now I start a jupyter server using jupyter notebook --no-browser which gives me a link. I click on that link but the browser (Chrome) says The site can't be reached. I tried replacing localhost with the IP address but the output is still the same.
Any help?
Finally got around to trying this - but unfortunately all options were grayed out and were very expensive anyway - even the NC6 was over $800 a month. I made a couple of requests for access but so far nothing has been granted. Might be a waste of time anyway with those prices…

You have to send email to MS office for enabling them the NC6 machines.Although it is is showing the 800$ …u will not that much .If u have leaready have MSDN account then it comes 150$ of monthly free credit and no credit card nor bank account details required.So dont worry just send amail to MS team.I am using azure through MSDN Visual Studio Enterprise account.
follow the above link
Thanks Susant,
I did send a message, but they haven’t granted it to me! Not sure why - I will try again.
But the other issue I could see is that these use Python 3.5 and CUDA 8, whereas the fast.ai requirements is 3.6 and CUDA 9. Are you able to upgrade the VM?
They will reply …it will take may 2-3 days .for me it took 3 days.
I am here in python 2.7 and heard that 2018 v1 is using python 3.6 but when i took the batch script for azure it is automatically took python 2.7 and i want to update also python 3.6
I am stuck with other issue like “import utils; reload(utils)
from utils import plots” although i ama bale to run the lession.ipnb and able to go upto some level.\
Thanks Susant
Did you build the fast.ai environment using conda env?
No i am using Git Bash for terminal
What I meant was, after doing a git clone to get the fast.ai library, did you then execute a conda env create -f environment.yml while in the newly created fastai directory, so that you could use the environment.yml file supplied by fastai?
In Short answer YES…
Long answer below steps i followed…
After connecting to SSH to ubuntu VM(DL VM is hosted in azure cloud and using MS DL VM ) through GIT Bash terminal …
I followed below steps…
Now, move into a directory where you are comfortable installing the Fastai repo, with its libraries and required packages.I did with default directory so default command i am using …
Now you got to clone that repo as follows:
git clone https://github.com/fastai/fastai
Once the cloning process finishes, be sure to be in the directory created by git for the Fastai repository, and type:
conda env create -f fastai/environment.yml
why absolute path of environment.yml(ie. fastai/environment.yml) required because of the below error. error-https://github.com/conda/conda/issues/3847
then activate conda environment like using below command
source activate fastai
why prefix ‘source’ is required in above command due to below error
now after activation of fastai conda environment type below command to open the jupyter notebook
(fastai)> jupyter notebook
Thanks for that information!
Having tried all of the steps outlived here and in other posts, I have created the fastai source and environment on my new NC6 instance.
To create the environment:
~/fastai$ conda env create -f ~/fastai/environment.yml
To activate it:
source activate fastai
But it doesn’t really work for me.
The first issue is that when I use the URL supplied when I invoke jupyter notebook I end up in my local system - not on the Azure box.
The second thing is I tried import torch from within ipython on the NC6 system, and I got an error (below) - so there must be some missing dependencies - but I am not sure how to tackle that!
Do you have any suggestions for either or both errors?
Python 3.6.4 |Anaconda, Inc.| (default, Mar 13 2018, 01:15:57)
Type 'copyright', 'credits' or 'license' for more information
IPython 6.2.1 -- An enhanced Interactive Python. Type '?' for help.

In [1]: import torch
---------------------------------------------------------------------------
ImportError                               Traceback (most recent call last)
<ipython-input-1-eb42ca6e4af3> in <module>()
----> 1 import torch

~/.conda/envs/fastai/lib/python3.6/site-packages/torch/__init__.py in <module>()
     54 except ImportError:
     55     pass
---> 56 from torch._C import *
     57
     58 __all__ += [name for name in dir(_C)

ImportError: /opt/intel/mkl/lib/intel64/libmkl_gf_lp64.so: undefined symbol: mkl_lapack_ao_ssyrdb
Related to this issue
“The first issue is that when I use the URL supplied when I invoke jupyter notebook I end up in my local system - not on the Azure box”
You are connecting to "linux vm hosted in azure cloud and to connect the VM machine either u can connect through remotely or through a Bash Shell window like cygwin/Git Bash from windows local machine.
Here are u inside Azure DL VM machine or you are connecting through the linux Bash command tool window?
If your are cnonecting to the VM for Linux Bash command window like CygWin/Git Bsh Shell window then you will open the link in your local browser but u will use the GPU of the Azure DL cloud VM.
For second pytorch is not installed corretcly perhaps…
SO install the pytorch
Thanks for replying Susant
I’ve connected through the Windows Linux subsystem Bash window.
I’ve tried the recommended approach ssh -L 8888:127.0.0.1:8888 myserverpaddress
I also tried without the -L 8888:127.0.0.1:8888
Once there, I start jupyter notebook --no-browser, and copy and paste the URL I am given into my browser (on my local PC). I just end up looking at the currently running notebooks on local PC, which also are on port 8888. I want to see the notebooks that are on the server.
For the pytorch, I thought that setting up the fastai environment should install that correctly. It starts, but is seems to need something it hasn’t got…
Perhaps something is broken in the latest Pytorch?
Or perhaps it’s because CUDA isn’t in sync?
When I nvcc -V I get this:
nvcc: NVIDIA ® Cuda compiler driver
Copyright © 2005-2016 NVIDIA Corporation
Built on Tue_Jan_10_13:22:03_CST_2017
Cuda compilation tools, release 8.0, V8.0.61
But when I look at the pytorch package I have this:
pytorch: 0.3.1-py36_cuda9.0.176_cudnn7.0.5_2 pytorch [cuda90]
Can I safely upgrade the CUDA, or is that fixed on the VM? Otherwise, I can step back to an earlier version of Pytorch, but I know it will handle some things differently, which is possibly an issue with the fastai programs which expect CUDA 90.
Regarding the notebooks - here are the ports that are open - perhaps I need to add 8888?

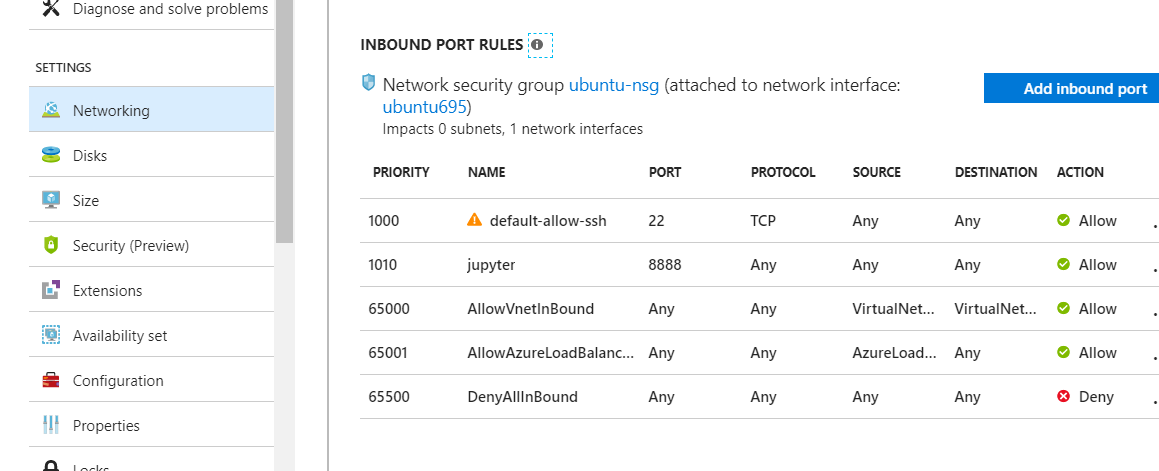
I’ve done that, but I am still getting the same behaviour 
Can you try closing your local server running on 8888 and then connect to the instance? I guess your request from the browser is first being served by local jupyter server.
Regarding pytorch, I have tried 10 days back and it’s working fine. Let me check once.
WIthout the local server running I get a clear error message:
This site can’t be reached
localhost refused to connect.
Search Google for localhost 8888
ERR_CONNECTION_REFUSED
Following something I found on the internet this is the result of using netstat:
netstat -an | grep "LISTEN "
tcp        0      0 127.0.0.1:8081          0.0.0.0:*               LISTEN
tcp        0      0 127.0.0.1:3476          0.0.0.0:*               LISTEN
tcp        0      0 0.0.0.0:22              0.0.0.0:*               LISTEN
tcp        0      0 127.0.0.1:8001          0.0.0.0:*               LISTEN
tcp6       0      0 :::22                   :::*                    LISTEN
tcp6       0      0 :::8000                 :::*                    LISTEN
tcp6       0      0 127.0.0.1:8005          :::*                    LISTEN
tcp6       0      0 :::8009                 :::*                    LISTEN
tcp6       0      0 :::8080                 :::*                    LISTEN