Hi,
When checking if theano works using the import theano statement, I am getting an exception:
Exception Traceback (most recent call last)
in ()
----> 1 import theano
/home/ubuntu/anaconda2/lib/python2.7/site-packages/theano/init.pyc in ()
114
115 if config.enable_initial_driver_test:
–> 116 theano.sandbox.cuda.tests.test_driver.test_nvidia_driver1()
117
118 if (config.device.startswith(‘cuda’) or
/home/ubuntu/anaconda2/lib/python2.7/site-packages/theano/sandbox/cuda/tests/test_driver.pyc in test_nvidia_driver1()
39 raise AssertionError(msg)
40 if not numpy.allclose(f(), a.sum()):
—> 41 raise Exception("The nvidia driver version installed with this OS "
42 "does not give good results for reduction."
43 "Installing the nvidia driver available on the same "
Exception: The nvidia driver version installed with this OS does not give good results for reduction.Installing the nvidia driver available on the same download page as the cuda package will fix the problem: http://developer.nvidia.com/cuda-downloads
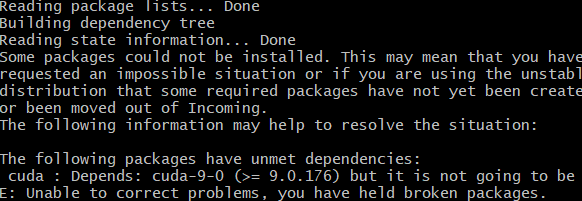
I managed to resolve it. In line 12 in the install-gpu.sh, cuda-repo-ubuntu1604_8.0.44-1_amd64.deb os downloaded. However in line 13, instead of installing cuda-8, it ends up installing cuda-9. So you will have to reinstall cuda. Use the following statements:-
sudo apt-get --purge remove cuda
sudo apt autoremove
[to remove cuda 9.0]
I finally got mine setup. Documenting it here in case anyone else has the same problem. I was having trouble with not being able to run jupyter notebook a second time. I was getting this error.
It was because the owner of the “.jupyter” directory had been set to root. From the “/home/ubuntu” directory, I did chown -R ubuntu:ubuntu .jupyter
This is most likely because running install-gpu.sh, installs Anaconda as root, at least it did on my machine. So you’ll also need to change the owner of the “anaconda2” directory too or you’ll run into trouble later chown -R ubuntu:ubuntu anaconda2
I got another error when running one of the cells in lesson1. I then changed .theanorc config to use the cuda backend instead of gpu:
Thanks a lot! I have exactly the same problem. Just in case there are some people who do not have a lot experience in linux just like me, I want to point out that sometimes there are both /home/ubuntu and /home/username directories(as least for my case). In this case you should look at the error message Permission denied: u'/home/XXXX/.jupyter/migrated'. XXXX is the directory where you wanna run the command given by @rocksock , thanks again!
Some further problems using google cloud and solution:
pygpu not installed --> conda install -c conda-forge pygpu
can not create new jupyter notebook --> change ownership of everything in \home\username\ from root to user. Use ls -l to check the ownership. I still don’t understand why but it works for me.
You’re welcome. Yes, you’re right, the “.jupyter” directory might not be in the directory called /home/ubuntu. It just was in my case because “ubuntu” happened to be the name of the Ubuntu user that I was using. It could be any name, (/home/XXXX/.jupyter) depending on the user you were using when Anaconda was installed.
And since Anaconda installs Jupyter, Anaconda’s parent directory will be the same as the directory in which Jupyter was installed, as indicated by the “anaconda2” directory, /home/XXXX/anaconda2
The point is, you’ll want to make sure the user you want to use when you run jupyter, the name of which is shown in the bash shell prompt before the space where you type your commands, e.g. XXXX@server-name:, you’ll want to make sure that that ‘XXXX’ is the same as the ‘XXXX’ in the directory that contains your ‘anaconda2’ and ‘.jupyter’ directory, /home/XXXX/.jupyter
I am currently on by $300 free credits on Google Cloud Platform and can’t seem to create an instance with GPUs. I have already increased my Quota of GPUs from 0 to 1 but whenever I try to create an instance, I get an error “Quota ‘NVIDIA_K80_GPUS’ exceeded. Limit: 0.0 in region us-west1.” Is anyone else facing the same problem and could someone help me out?
Any thoughts on using p100 instead of k80? There are 3x more expensive, and according to google blog can be up to 10x faster :
Edit: I actually found some benchmarks - so p100 is only 2-3 times faster, and thus not cost-effective.:
As for the price of preeemtible GPUs, they cost 0.22$/h for K80 and 0.72$/h for P100. (The price estimate when creating an instance using the console is misleading - they show full price for GPUs but google will only charge those preemtible prices).
All in all, I tried P100 on a simple vgg model and the training time for each epoch was about 1.8 times faster compared to K80. So, not worth the additional cost. Unless you factor in the fact, that faster training will allow more experimentation and thus possibly better results in the long run.
And perhaps more experienced users can squeeze out better perfomance out of P100 then I was able.
I faced this problem before. GPU is only available in certain Google Cloud Platform (GCP) regions/zones. You have to be careful when you choose the region to increase the GPU quota. For more info, check out the GCP documentation here:
Hi everyone, I am new to ML and Google Cloud Platform and much appreciate your help on how to move forward. Currently, I am taking the Stanford CS231 course remotely and following the Google Cloud Setup tutorial http://cs231n.github.io/gce-tutorial/ on my Mac machine.
I am able to:
Create the Google Cloud Platform VM instance -> Done
Start the VM instance -> Done
In my Mac Terminal command line: gcloud compute ssh zhang.yin9393@instance-2 --zone=us-west1-b -> Done
After SSHed into my google cloud VM instance via my Mac Terminal in step3,
cd into assignment1 -> Done
In zhang.yin9393@instance-2:~/assignment1$, run the the command: ./setup_googlecloud.sh --> Displayed error message:
perl: warning: Setting locale failed.
perl: warning: Please check that your locale settings:
LANGUAGE = (unset),
LC_ALL = (unset),
LC_CTYPE = “UTF-8”,
LANG = "en_US.UTF-8"
are supported and installed on your system.
perl: warning: Falling back to a fallback locale (“en_US.UTF-8”).
locale: Cannot set LC_CTYPE to default locale: No such file or directory
locale: Cannot set LC_ALL to default locale: No such file or directory
In zhang.yin9393@instance-2:~/assignment1$, ran command: locale
and it displayed:
zhang.yin9393@instance-2:~/assignment1$ locale
locale: Cannot set LC_CTYPE to default locale: No such file or directory
locale: Cannot set LC_ALL to default locale: No such file or directory
LANG=en_US.UTF-8
LANGUAGE=
LC_CTYPE=UTF-8
LC_NUMERIC="en_US.UTF-8"
LC_TIME="en_US.UTF-8"
LC_COLLATE="en_US.UTF-8"
LC_MONETARY="en_US.UTF-8"
LC_MESSAGES="en_US.UTF-8"
LC_PAPER="en_US.UTF-8"
LC_NAME="en_US.UTF-8"
LC_ADDRESS="en_US.UTF-8"
LC_TELEPHONE="en_US.UTF-8"
LC_MEASUREMENT="en_US.UTF-8"
LC_IDENTIFICATION="en_US.UTF-8"
LC_ALL=
In zhang.yin9393@instance-2:~/assignment1$ , ran command: update-locale LC_CTYPE=en_US.UTF-8
perl: warning: Setting locale failed.
perl: warning: Please check that your locale settings:
LANGUAGE = (unset),
LC_ALL = (unset),
LC_CTYPE = “UTF-8”,
LANG = "en_US.UTF-8"
are supported and installed on your system.
perl: warning: Falling back to a fallback locale (“en_US.UTF-8”).
update-locale: Unable to write /etc/default/locale: Permission denied
My first question is: whether the above locale error is the blockage for the ./setup_googlecloud.sh for Standford cs231n assignment1? If so, can someone help to shed lights on where might be wrong in the above commands? As I got those commands from some posts that I searched online for Ubuntu (sorry I am not able to post all the links I researched on as I am a new user in this forum), e.g. https://www.thomas-krenn.com/en/wiki/Configure_Locales_in_Ubuntu, etc.
Then, I also tried to
8. In zhang.yin9393@instance-2:~/assignment1$, ran the command: source .env/bin/activate --> Failed and the got the following error:
-bash: .env/bin/activate: No such file or directory
My second question is: the source .env/bin/activate command (in the cs231n google cloud tutorial) doesn’t work, is that because of the ./setup_googlecloud.sh in the assignemnt1 folder is incomplete by having locale error?
I appreciate your help in advance! Hope I can get started with Stanford cs231n assignment 1 and my ML journey soon.
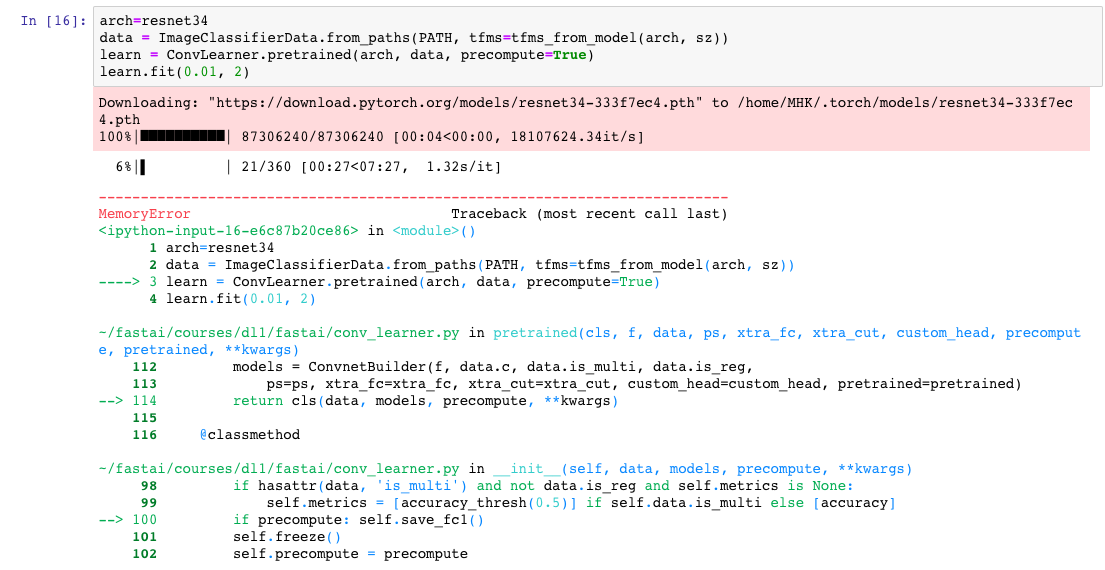
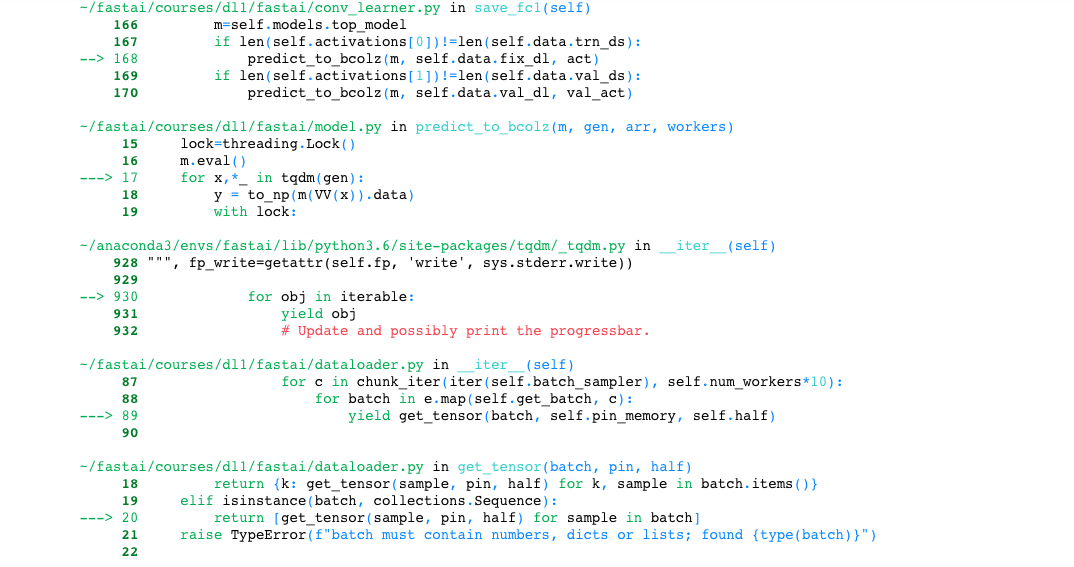
It says memory error, so what I tried to do to solve this problem is increase the assigned number of persistent GBs when setting up the instance. I increased it progressively from 20 to 50, and then 100GB. It gets stuck at the same place with the same error messages. What could the reason be?
I had a different kind memory error when I first created my Google cloud. I tried the same thing as you did, upping the memory, but it didn’t go away. Rebooting didnt help.
What worked was recreating the whole instance from scratch with a bigger disk (50). Hope it works for you.
Thanks @Seb
I had tried recreating the whole instance with 100GB disk, and it didn’t work either.
I just found a solution to my problem though - I reduced the batch size for the data object (it is set to 64 by default). That did the trick. Why it did the trick - I have yet to figure that out. Any ideas?
Thank you for the guide, it’s proving incredibly useful!
I am just wondering about what steps would be needed in order to run things from Part 2 of the course, in particular the ULMFiT model (imdb.ipynb). Would a simple condo env update suffice? Or just upgrading to py3?