Exposing DL models as api's/microservices

I’ve recently done this after watching Jeremy’s Part1 v2 class.

One different from my approach with what I found online is I used PyTorch, instead of Tensorflow/Keras, and I didn’t want to convert the model to Tensorflow. It’s a resnet101 model with an AdaptiveConcatPool2d layer as the penultimate layer (ie. what the Fast.ai ConvLearner would do if you set arch=resnet101_64).

As a result, I couldn’t deploy to Google Cloud ML, so I created a Docker image and deployed to Digital Ocean instead.

The main challenge was getting the right setup for the docker image, which was actually way harder than I expected. I’ve pasted the Dockerfile and requirements.txt below in the hopes that it’ll save someone else a lot of time. If anyone has suggestions on how I can make the config better, please let me know! I’m definitely not a devops guy, so this was all pretty challenging to me.

Also, for my resnet101, I had to increase the amount of RAM dedicated to Docker to 4GB or else it would run out of memory.

Dockerfile:

FROM ubuntu:16.04

RUN apt-get update && apt-get install -y --no-install-recommends \
    build-essential \
    ca-certificates \
    cmake \
    curl \
    gcc \
    git \
    libatlas-base-dev \
    libboost-all-dev \
    libgflags-dev \
    libgoogle-glog-dev \
    libhdf5-serial-dev \
    libleveldb-dev \
    liblmdb-dev \
    libopencv-dev \
    libprotobuf-dev \
    libsnappy-dev \
    protobuf-compiler \
    python-dev \
    python-numpy \
    python3-pip \
    python-scipy \
    python3-setuptools \
    vim \
    unzip \
    wget \
    zip \
    && \
    rm -rf /var/lib/apt/lists/*

# Source Code
WORKDIR /app
ADD . /app

# Install any needed packages specified in requirements.txt
RUN pip3 install --upgrade pip
RUN pip3 install --trusted-host pypi.python.org -r requirements.txt

# Make ports 80 or 4000 available to the world outside this container
# EXPOSE 80
EXPOSE 4000

# Run app.py when the container launches
CMD ["python3", "app.py"]

requirements.txt:

Flask
numpy
pillow
pandas
http://download.pytorch.org/whl/cu80/torch-0.3.1-cp35-cp35m-linux_x86_64.whl 
torchvision
torchtext
16 Likes

I think it would make an interesting blog post if you were to describe how you got this working, if you had the time and interest in writing one.

9 Likes

Haven’t gone through the blog post in detail but it is making sense at a high level:

5 Likes

If you want to build a website around this instead of just being an api, I have really liked Django so far. The tutorial I used is https://tutorial.djangogirls.org/en/. It is a great tutorial that starts out with zero assumptions and works up to a point where you can actually deploy a Django web application using pythonanywhere which is a handy site that handles a lot of the host deploying work (which does kind of suck). I started there and then once I got it working, I set up a digital ocean server so I could have multiple applications deployed on the same server.

11 Likes

I’m deeply interested in this as well. Especially on deploying pytorch models since that’s my main development language now.

I did write a blog post back when I was working primarily in Keras on how to export a model for deployment on tensorflow-serving.

Getting the configuration right here took several days worth of digging around and was a significant challenge so hopefully some people will find it helpful.

It doesn’t cover the tf-serving side, which is a whole other challenge in and of itself to setup and get running correctly. I’m hoping the engineer I worked with on that is going to publish a matching blog post soon and if/when he does I’ll link to it from mine.

We ended up wrapping the call in a tornado server to do error handling and pre/postprocessing. We explore docker initially for scalability, but with a GPU instance you can’t deploy more than one container per machine so there wasn’t much point but for CPU inference it makes more sense.

2 Likes

Thanks everyone for this very practical and useful thread so far.

@ramesh and I set up and deployed a minimalist web app demonstrating predictions by an object detection pytorch model trained with the Fast.ai library. We used Flask to set up the app with a /predict API endpoint, Nginx & Gunicorn to manage the app/requests, and Paperspace’s c2 CPU-only instance for hosting.

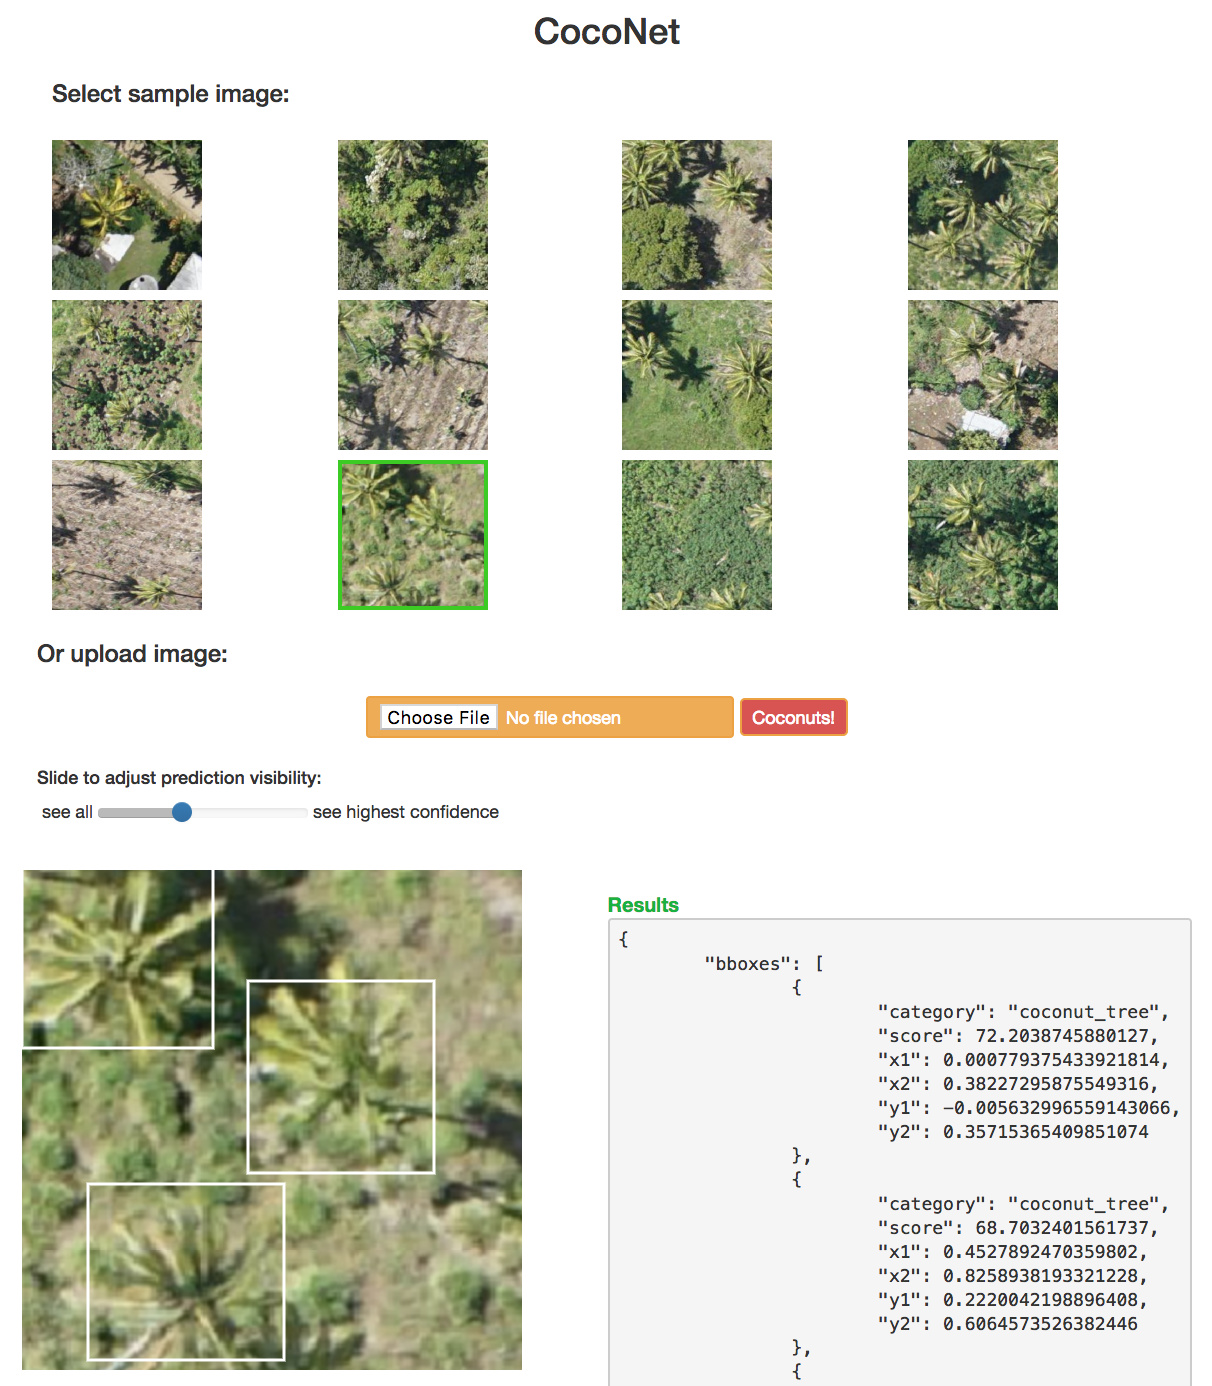
Here is the demo app for “CocoNet”, the coconut tree aerial object detection model adapted from lesson 9 (pascal-multi):

06%20PM
http://65.19.132.170/

github: https://github.com/daveluo/cocoapp

@ramesh deserves all the credit for setting up flask, conda env requirements, and the very cool idea of drawing prediction bounding boxes using Canvas elements. Canvas lets us avoid generating any SVGs or JPGs. POSTing a sample or uploaded image to /predict returns all of our predictions (class, confidence scores, and bounding box coordinates) in json (seen in the “Results” box) and then we can dynamically draw none, some, or all of the bounding boxes based on a prediction confidence score threshold by adjusting the slider.

We tried to minimize package dependencies so we copied over just the parts we needed from fastai (like functions for val_tfms and model definition) instead of importing the entire library or modules although that is also do-able. Please also note that we haven’t extensively tried all available deployment options or optimized much in any way. We tried to get to a working implementation as quickly as possible and this is the first approach that worked so I’m sure we have much room to learn and tweak!

Here is an overview and some notes about our approach:

  1. Train and optimize model using fast.ai library to our liking and/or max performance in jupyter notebook as usual for the class.

  2. Since we’ll be deploying on a CPU-only machine, duplicate and run a CPU-only version of our training notebook to make sure our model and functions needed for prediction don’t have any GPU/cuda requirements. We don’t need to retrain model; just make sure we can load a previously trained and saved model (from learn.save(), learn.load()) and get the same predictions on a test image with CPU only.

  3. Create a .py module to hold the classes, functions, and variables that define our model by copying over the relevant code cells from our CPU-tested notebook.

  4. Test that our model definition .py has everything we need within our CPU-only notebook: use from cocomodel import * in place of running the copied notebook cells and confirm we are still predicting correctly.

  5. Repeat the same approach for other needed image processing and utility functions: copy or rewrite code cells from notebook as functions into new .py module -> import module into notebook -> re-run prediction of image using only functions from the imported module.

    • Key functions include those to open and transform an image into the pytorch tensor format needed by our model, defining anchor boxes (which could also go into the model definition .py file), non-max suppression of predictions if we want to use it, etc.
    • Example: util.py
  6. Once we’ve copied our prediction-dependent code to their respective .py modules and tested that imports work correctly, save our model in the notebook as a pytorch .pt file using torch.save(model, 'filename.pt') and model = torch.load('filename.pt') (pytorch doc). Test again that everything works by importing the modules we created, creating a new model loaded from our saved .pt file and making a prediction on a loaded image:

from cocomodel import * 
from util import *

learn2 = torch.load('cocomodel_0502.pt')

test_img = open_image(IMG_PATH/'01.jpg')
p_img = preproc_img(test_img)
pr_cl, pr_bb = learn2(p_img)

print(pr_bb)
Variable containing:
( 0  ,.,.) = 
  1.2554e-01 -1.8171e-02 -3.9333e-02  1.0551e-01
  9.2975e-02  4.5186e-02  8.8762e-02 -1.2309e-01
 -1.5383e-01  1.9479e-01 -1.3443e-01  1.8663e-01
                       ⋮                        
  1.9889e-01  8.4555e-02 -5.8950e-02 -2.2468e-02
 -7.0903e-02 -6.7226e-01 -7.7523e-02 -1.2740e+00
 -2.7304e-01  5.3554e-03 -1.1811e+00 -1.4910e-02
[torch.FloatTensor of size 1x9441x4]
  1. Create get_prediction() (and associated functions) in util.py that flask will need to pass an image from the /predict endpoint, convert it into pytorch format, run prediction through our model, and then convert the predicted outputs back to a display-ready format that flask expects. We want to get back a json-able dict with class, score, and bbox coordinates that are (0,1) relative to image dimensions and (left x, top y, right x, bottom y) so that looks like:
def pred2dict(bb_np,score,cat_str):
    # convert to top left x,y bottom right x,y
    return {"x1": bb_np[1],
            "x2": bb_np[3],
            "y1": bb_np[0],
            "y2": bb_np[2],
            "score": score,
            "category": cat_str}

def get_predictions(img, nms=True):
    img_t = preproc_img(img)
    model  = load_model()

    #make predictions
    p_cl, p_bb = model(img_t)

    #convert bb and clas
    a_ic = actn_to_bb(p_bb[0], anchors, grid_sizes)
    clas_pr, clas_ids = p_cl[0].max(1)
    clas_pr = clas_pr.sigmoid()
    clas_ids = to_np(clas_ids)

    #non max suppression (optional)
    if nms: a_ic, clas_pr, clas_ids = nms_preds(a_ic, p_cl, 1)

    preds = []
    for i,a in enumerate(a_ic):
        cat_str = 'bg' if clas_ids[i]==len(id2cat) else id2cat[clas_ids[i]]
        score = to_np(clas_pr[i])[0].astype('float64')*100
        bb_np = to_np(a).astype('float64')
        preds.append(pred2dict(bb_np,score,cat_str))

    return {
        "bboxes": preds     
        }

  1. Create our flask app. There’s too much to describe it all in detail here so we suggest looking through our repo, tutorials on using Flask to deploy ML models as APIs, and minding these pointers and pitfalls we ran into:

    • torch.save() serializes by default with pickle and has some quirkiness about how module namespaces are saved and needing to explicitly import your model class definitions when unpickling using torch.load(). If we didn’t do it right, we would run into AttributeError: Can't get attribute 'SOME_ATTRIBUTE_NAME' on <module '__main__'>. There are pytorch forum/StackOverflow discussions where the overall recommendation is to use torch.save(the_model.state_dict(), PATH) instead of saving and loading the whole model. We didn’t do this because we were careful with how we import our modules (thus avoiding the problem) but we will probably try the recommended approach in the future/when refactoring.
    • If changes you made to flask don’t seem to be appearing when you run the app, check that your browser cache is cleared or disabled. I’ve been frustrated quite a few times with why things weren’t working until I remembered the cache :).
    • Here are other lightweight pytorch + flask deployments we looked at for reference:
  2. At this point, we are able to test our Flask app locally by executing python run.py in the terminal and browsing to localhost:5000 (or whichever port you’ve config’ed to).

  3. To set up the correct package dependencies when deploying outside of our local machine, we relied on Anaconda and .yml files to build a new environment with conda env create -f environment.yml.

    • The quickest way to create a .yml file is to activate a conda environment locally where we have our flask app working and export by running conda env export > NAME_OF_ENVFILE.yml.
    • However, depending on what else we’re doing with our env, this may end up creating more dependencies than we need to run our app. Another way is that we can create a new env (conda create -n myenv python=3.6), conda install the bare minimum packages we know we need (like flask, pip, pytorch), attempt to run the flask app, check which missing package errors pop up, and iteratively install packages until no more errors appear and the app runs successfully. This way, we create an env file that only has what the app needs and no more:
name: coco-app
channels:
  - pytorch
  - defaults
dependencies:
  - python>=3.6
  - pip
  - cython>=0.28
  - pyyaml
  - flask==0.12.2
  - torchvision=0.2
  - pytorch=0.3.1
  - pip:
    - opencv-python>=3.4
    - gunicorn>=19.8
  1. To deploy remotely, pick a host of choice. We used Paperspace c2 instance out of familarity but AWS, DigitalOcean, etc should all work. We selected an Ubuntu 16.04 template, installed Anaconda, uploaded our .yml file we created in the last step, conda env create, waited for everything to download, activate dthe env, python run.py, browsed to the public ip and the correct port, and that’s it, at least for local testing purposes.
    • We first tried to deploy on Heroku but we couldn’t find a way to get around the slug size limit of 500MB when the pytorch package alone is ~500MB. In retrospect, the free tier of Heroku wouldn’t have worked anyways because it only has 512MB of RAM when we need between 512MB-1GB. So the morale of this story I guess is don’t use Heroku?
    • We also needed to install a few random system packages and open up port 5000 in the firewall: sudo ufw allow 5000
  2. For more stable deployment, we added Gunicorn and Nginx to handle the Flask app. Here is a great tutorial which we followed without any issue: https://www.digitalocean.com/community/tutorials/how-to-serve-flask-applications-with-gunicorn-and-nginx-on-ubuntu-16-04

So that’s the 12 step plan! Speaking for myself as a newbie, this was my first time using many of these tools (flask, gunicorn, nginx) so I was happy to discover how lightweight and straightforward the deployment process can be. And take another opportunity to restate that this is NOT an exemplar of elegance or efficiency :slight_smile: Thanks again to @ramesh for his expertise, intellectual generosity, and admirable patience in answering every back-to-basics question I had.

We were surprised there aren’t better online tutorials detailing the pytorch-flask deployment process end-to-end so we plan to write up a blog post (or a series if it gets too unwieldy). Please feel free to ask questions or suggest ways we could have executed or explained something better. I’m sure we forgot to mention crucial details or assumptions at the least. All feedback is helpful and welcomed!

75 Likes

Looking forward for your blog post. Awesome explanation

Yes please! This is great :slight_smile:

Nice walkthrough. Do let us know when the blog post is ready. Now, I wonder how this will all align when PyTorch 1.0 arrive some time during the summer (plan). PyTorch 1.0 will integrate PyTorch and Caffe2 which gives the production-level readiness for PyTorch. I hope we get something like TensorFlow Serving/MXNet Model Server then for serving PyTorch models and hosting the web app.

1 Like

Please, can you indicate how did you do the torch.save(model), I mean how did you parse it from fastAI learner to a Sequential pytorch type.

Thanks everyone for the feedback!

@jm0077, I’ve made a gist to demo the 2 options to save and load a model in pytorch:

It also shows the whole sequence of training a model on GPU, saving the .h5 model file with fastai, loading that .h5 file locally and testing CPU-only predictions, and then the two ways to save and load the model using pytorch only.

Note that I didn’t demo copying the model definition functions into its own module (step 3 above). If you were to do that (recommended), you should test the module import first before doing the local pytorch save and load model steps.

Also note that fast.ai uses save option 2 (the recommended saving and loading weights via m.state_dict()) under the hood:

In torch_imports.py:

def save_model(m, p): torch.save(m.state_dict(), p)
def load_model(m, p): m.load_state_dict(torch.load(p, map_location=lambda storage, loc: storage))

Hope that’s helpful!

10 Likes

Thanks @daveluo! your gist give me a better idea about the models in pytorch.
However I have an issue, maybe you can help me.
In the first part of the training, the learner object is created using:

learn = ConvLearner.pretrained(arch, data, precompute=True, ps=0.5)

When I visualize that model, it has only 7 layers:

    Sequential(
  (0): BatchNorm1d(4096, eps=1e-05, momentum=0.1, affine=True)
  (1): Dropout(p=0.5)
  (2): Linear(in_features=4096, out_features=512, bias=True)
  (3): ReLU()
  (4): BatchNorm1d(512, eps=1e-05, momentum=0.1, affine=True)
  (5): Dropout(p=0.5)
  (6): Linear(in_features=512, out_features=5, bias=True)
  (7): LogSoftmax()
)

After the training on the model is done, it has 17 layers, I guess is due to the unfreeze of the model. The problem is when I try to save the model (entire model) it gives me the following error:

Can't pickle local object 'resnext_50_32x4d.<locals>.<lambda>'

So I tried the 2nd method, only save weights instead of the entire model.

torch.save(learn.model.state_dict(), "./torch_model_v1.pt")

It was good but later in order to load the weights I need a model to do that. So how can I get an initialized model with the same architecture (resnext_50) in order to load the weights?

Thanks in advance!

2 Likes

Hi @jm0077,

The Can't pickle local object error you see is related to pickle not being able to serialize the resnext_50_32x4d model creation function (from here) somewhere along the line (probably wherever it’s being called as a lambda function). The middle of this article describes this limitation of pickle: https://medium.com/@jwnx/multiprocessing-serialization-in-python-with-pickle-9844f6fa1812

What did seem to work is using dill instead of pickle to serialize (torch.save enables this through the pickle_module= attribute). Thanks to @ramesh for the offline suggestion to try dill. I did a quick test saving a ConvLearner.pretrained() model with arch=resnext50 using dill and it seemed to save the entire model, load it successfully after restarting the kernel and generate predictions correctly and consistently:

import dill as dill
torch.save(learn.model,'test_resnext50.pt', pickle_module=dill)

I haven’t extensively tested using dill though so can’t promise there won’t be other issues down the line.

If you want to use the 2nd method of saving and loading the weights only, you need to re-initialize your model in the same way you originally defined and created your model when you saved the weights. You have to make sure the variables, classes, functions that go into creating your model are available, whether through module imports or directly within the same script/file.

In the example from my original gist, this looks like:

# model definition stuff
from fastai.conv_learner import *
PATH = Path("data/cifar10/")

stats = (np.array([ 0.4914 ,  0.48216,  0.44653]), np.array([ 0.24703,  0.24349,  0.26159]))
bs=256
sz=32

tfms = tfms_from_stats(stats, sz, aug_tfms=[RandomFlip()], pad=sz//8)
data = ImageClassifierData.from_paths(PATH, val_name='test', tfms=tfms, bs=bs)

def conv_layer(ni, nf, ks=3, stride=1):
    return nn.Sequential(
        nn.Conv2d(ni, nf, kernel_size=ks, bias=False, stride=stride, padding=ks//2),
        nn.BatchNorm2d(nf, momentum=0.01),
        nn.LeakyReLU(negative_slope=0.1, inplace=True))

class ResLayer(nn.Module):
    def __init__(self, ni):
        super().__init__()
        self.conv1=conv_layer(ni, ni//2, ks=1)
        self.conv2=conv_layer(ni//2, ni, ks=3)
        
    def forward(self, x): return x.add(self.conv2(self.conv1(x)))

class Darknet(nn.Module):
    def make_group_layer(self, ch_in, num_blocks, stride=1):
        return [conv_layer(ch_in, ch_in*2,stride=stride)
               ] + [(ResLayer(ch_in*2)) for i in range(num_blocks)]

    def __init__(self, num_blocks, num_classes, nf=32):
        super().__init__()
        layers = [conv_layer(3, nf, ks=3, stride=1)]
        for i,nb in enumerate(num_blocks):
            layers += self.make_group_layer(nf, nb, stride=2-(i==1))
            nf *= 2
        layers += [nn.AdaptiveAvgPool2d(1), Flatten(), nn.Linear(nf, num_classes)]
        self.layers = nn.Sequential(*layers)
    
    def forward(self, x): return self.layers(x)

# initialize model
m = Darknet([1, 2, 4, 6, 3], num_classes=10, nf=32)
learn3 = ConvLearner.from_model_data(m, data)

# load weights
learn3.model.load_state_dict(torch.load('cf10dn_cpuweights.pt'))

In your case, you would create a new learn = ConvLearner.pretrained(...) and load weights with learn.model.load_state_dict().

6 Likes

I’d like to suggest an alternative model to maintaining servers on the cloud and using serverless infrastructure (AWS lambda for example). This is inexpensive and easier to maintain according to the research. http://aclweb.org/anthology/N18-5002

2 Likes

There’s a thread, complete with an excellent example github by @alecrubin over here:

Definitely check it out if you’re interested in the topic. :slight_smile:

2 Likes

I’m sorry for hijacking the thread but I wanted to share a different type of deploying a model.

I’m a Computational Environmental Designer by trade which means I spend a lot of time running environmental performance studies (energy, daylight, thermal comfort, solar radiation, pv, etc. etc.). Our design spaces (or datasets in AI lingo) are very small compared to most datasets you’re used to but the cost function is usually terribly expensive. An energy simulation for a 4x4 room might take 30secs, so you’d need about a couple of weeks for 45000 models which is a modest dataset.

In one of my experiments of bringing AI to the AEC I’ve been kind of supercharging this parametric design process with ML models. In this case a design is a set of inputs (features) that define different aspects of the building (HVAC system, constructions, orientation, climate zone, etc.). This is built in Grasshopper, a virtual algorithmic environment. When I’ve run some data and after I’ve trained my model I can then ‘bring it back’ into Grasshopper and use it as a sort of ‘generator’ of results.

The image above shows inputs being fed and the model automatically predicting performance.

I realize this isn’t as fancy as REST API but it can really be quite useful in our line of work. In any case, I thought a different approach might be interesting!

On another note, those were models trained on an ensemble of GBMs. For a range of target values between 600-5000, with an average around 2000, I was getting a mean absolute error of 14.9, which was pretty good considering that my training dataset was 20% and I was predicting on the 80%! Now, just today I tried a very (very) quick run of the Entity Embedding implementation in FastAI and I got a 27% reduction in the error (down to almost 10) in just a few minutes, despite tha fact that my categorical variables are really ‘shallow’ (about 2-5 different categories usually)! And the model is blazing fast! I really think it has a great potential in my field, where structured, tabular data is the norm. What I also love is how beautifully it has captured the variance in the data (image below).

I…think I’ve said about 2000 words too much, not to mention hijacking the thread! If anyone feels this is interesting, or in the way, I’d be glad to move it to a separate thread.

Kind regards,
Theodore.

7 Likes

I am using the fastai/courses/dl1/lesson.ipynb and I save the weights like this :

arch=resnet34
data = ImageClassifierData.from_paths(PATH, tfms=tfms_from_model(arch, sz))
learn = ConvLearner.pretrained(arch, data, precompute=True)
learn.save('modelweights')

After that, I copied the file to /static/_model/modelweights.h5

but when I ran, python server.py it is giving the following error

### start server  2018-07-19 12:01:39.808413

### image upload folder: /home/ubuntu/flask_fastai_CNN/static/_uploads/unknown/

### data folder: /home/ubuntu/flask_fastai_CNN/static/data/redux
Using gpu device 0: Tesla K80 (CNMeM is disabled, cuDNN Mixed dnn version. The header is from one version, but we link with a different version (5103, 7005))
Using Theano backend.

### initializing model: 
VVV/home/ubuntu/flask_fastai_CNN/static/_model/modelweights.h5
Traceback (most recent call last):
  File "server.py", line 52, in <module>
    vgg = Vgg16()
  File "/home/ubuntu/flask_fastai_CNN/utils/vgg16.py", line 32, in __init__
    self.create()
  File "/home/ubuntu/flask_fastai_CNN/utils/vgg16.py", line 84, in create
    model.load_weights(trained_model_path)
  File "/home/ubuntu/anaconda2/lib/python2.7/site-packages/keras/engine/topology.py", line 2494, in load_weights
    f = h5py.File(filepath, mode='r')
  File "/home/ubuntu/anaconda2/lib/python2.7/site-packages/h5py/_hl/files.py", line 269, in __init__
    fid = make_fid(name, mode, userblock_size, fapl, swmr=swmr)
  File "/home/ubuntu/anaconda2/lib/python2.7/site-packages/h5py/_hl/files.py", line 99, in make_fid
    fid = h5f.open(name, flags, fapl=fapl)
  File "h5py/_objects.pyx", line 54, in h5py._objects.with_phil.wrapper
  File "h5py/_objects.pyx", line 55, in h5py._objects.with_phil.wrapper
  File "h5py/h5f.pyx", line 78, in h5py.h5f.open
IOError: Unable to open file (file signature not found)

Please tell me where I am wrong

I have explore this area further when I was building a real-world data product recently. The design was inspired by Dave’s posts.

Application System Architecture for Data-driven Product

We know that our application user interface will demonstrate what is possible, it needs to be loosely coupled to the trained models which are doing the core predictive tasks.

In order to preserve a bright line separation of concerns, we break the overall application down into several constituent pieces. Here’s an extremely high level view of the component hierarchy:

  • The job of the prediction service (via the trained models it wraps) is to implement these core predictive tasks and expose them for use, respectively. The models themselves shouldn’t need to know about the prediction service which in turn should not need to know anything about the interface application.
  • The job of the interface backend (API) is to ferry data back and forth between the client browser and model service, handle web requests, take care of computationally intensive transformations not appropriate for frontend Javascript, and persist user-entered data to a data store. It should not need to know much about the interface frontend, but it’s main job is to relay data for frontend manipulation so it’s acceptable for this part to less abstractly generalizable than the prediction service.
  • The job of the interface frontend (UI) is to demonstrate as much value as possible by exposing functionality that the models make possible in an intuitive and attractive format.

Here’s a visual representation of this architecture:

6 Likes

@cedric You should take a look at clipper.ai which @QWERTY1 recently shared. It’s out of the Berkeley RISE lab and is a very well thought out framework for model serving as an API. The website doesn’t really do the framework justice in my mind and the videos are definitely worth looking at. It’s very similar to what you’ve layed out, but has a few more details outlined. It looks like you’ve thought of some other aspects as well so it may be worthwhile joining forces and contributing your ideas/work.

I’m currently trying to convince my company to adopt it for model serving so that we can work on it and help improve it but so far I’ve been very impressed with what it does and their roadmap.

4 Likes

Hi Even, thank you for sharing. That sounds very interesting. This is my first time hearing about clipper.ai. I have seen Polyaxon before. I have glanced through clipper.ai’s website and you are right, it’s a bit light on information. With that in mind, I head over to their codebase and have taken a quick peek at some codes/Dockerfiles there. So far, it leaves me with some impression that it’s worth looking at. So, I plan to take a more serious look at it soon and see if I can contribute in some ways if time allows.

I see. Good to hear.